今日内容
1
2
3
4
5
6
7
8
9
10
11
12
13
14
15
16
17
18
19
20
21
22
23
|
-拦截器使用
-拦截器总结
-拦截器逆向重点
-retrofit使用
-retrofit使用逆向重点
-乱码问题
-c语言之整形
-c语言之浮点型
-运算符
-if判断
-循环
-函数
-字符和字符串
-数组
|
零 xml持久化
1
2
3
4
5
6
7
8
9
10
11
12
13
14
15
16
17
18
19
20
21
22
23
24
25
26
27
28
29
30
31
32
|
adb shell
su
cd /data/data
cd 包名
cd shared_prefs
ls
cat sp_token.xml
SharedPreferences sp = getSharedPreferences("sp_token", MODE_PRIVATE);
SharedPreferences.Editor editor = sp.edit();
editor.putString("token","111111");
editor.commit();
SharedPreferences sp = getSharedPreferences("sp_token", MODE_PRIVATE);
SharedPreferences.Editor editor = sp.edit();
editor.remove("token");
SharedPreferences sp = getSharedPreferences("sp_token", MODE_PRIVATE);
String token = sp.getString("token","");
注意:后期逆向时经常使用,放在xml中的一般都是app刚启动时、刚登录时。
|
一 拦截器
1
2
3
4
5
6
7
8
9
10
11
12
13
14
15
16
17
18
19
20
21
22
|
在安卓端发送请求时,每次都要携带固定的数据(请求头中携带),以后不需要每次都手动添加,只需要写一次,以后只要发请求就会携带,
使用拦截器
1 定义拦截器--》可以定义多个-->
-方式一:写一个类,继承Interceptor,重写intercept方法
-方式二:直接实例化并得到对象
Interceptor interceptor = new Interceptor() {
@Override
public Response intercept(Chain chain) throws IOException {
Request request = chain.request().newBuilder().addHeader("ctime", "").addHeader("sign", "").build();
Response response = chain.proceed(request);
return response;
}
};
2 在发送请求时,使用拦截器
OkHttpClient client = new OkHttpClient.Builder().addInterceptor(interceptor).build();
|
1.1 实战
MainActivity.java
1
2
3
4
5
6
7
8
9
10
11
12
13
14
15
16
17
18
19
20
21
22
23
24
25
26
27
28
29
30
31
32
33
34
35
36
37
38
39
40
41
42
43
44
45
46
47
| public void loginForm() {
String username = String.valueOf(txt_user.getText());
String password = String.valueOf(txt_pwd.getText());
String sign = Utils.md5(username + "justin");
String ctime = String.valueOf(System.currentTimeMillis() / 1000);
Toast t = Toast.makeText(MainActivity.this, "登录成功", Toast.LENGTH_LONG);
new Thread() {
@Override
public void run() {
CommonInterceptor interceptor=new CommonInterceptor();
OkHttpClient client = new OkHttpClient.Builder().addInterceptor(interceptor).build();
FormBody form = new FormBody.Builder().add("username", username).add("password", Utils.md5(password)).add("sign", sign).build();
Request req = new Request.Builder().url("http://192.168.1.12:8080/login").post(form).build();
Call call = client.newCall(req);
try {
Response res = call.execute();
ResponseBody body = res.body();
String dataString = body.string();
CommonResponse obj = new Gson().fromJson(dataString, CommonResponse.class);
t.show();
} catch (IOException e) {
Log.e("MainActivity", e.toString());
}
}
}.start();
}
|
interceptor/CommonInterceptor.java
1
2
3
4
5
6
7
8
9
10
11
12
13
14
15
16
17
18
19
20
21
22
| import java.io.IOException;
import okhttp3.Interceptor;
import okhttp3.Request;
import okhttp3.RequestBody;
import okhttp3.Response;
public class CommonInterceptor implements Interceptor {
@Override
public Response intercept(Chain chain) throws IOException {
String ctime=String.valueOf(System.currentTimeMillis() / 1000);
String sign= Utils.md5(ctime);
Request request = chain.request().newBuilder().addHeader("ctime", ctime).addHeader("sign", sign).build();
Response response = chain.proceed(request);
return response;
}
}
|
1.2 安卓项目常用做法
定义一个静态变量
1
2
3
4
5
6
7
| import com.justin.demo.interceptor.CommonInterceptor;
import okhttp3.Interceptor;
public class Common {
public static Interceptor interceptor=new CommonInterceptor();
}
|
以后用直接使用,不需要每次都实例化
1
| OkHttpClient client = new OkHttpClient.Builder().addInterceptor(Common.interceptor).build();
|
1.3 逆向
1
2
3
4
5
6
7
8
9
10
11
12
13
14
15
16
17
18
19
20
21
22
23
24
25
26
27
28
|
1 根据关键字进行定位(Interceptor):
参数不在业务逻辑而是在拦截器中
关键字搜索 Interceptor ,很可能就是算法生成的位置
2 通过hook定位有哪些拦截器,通过Hook addInterceptor 看执行多少次,就能确定有多少拦截器
hook的通用的脚本
scr = """
Java.perform(function () {
var Builder = Java.user("okhttp3.OkHttpClient.Builder");
Builder.addInterceptor.implementation = function(interceptor){
console.log(interceptor, JSON.stringify(interceptor))
}
});
"""
OkHttpClient client = new OkHttpClient.Builder().addInterceptor(interceptor).build();
class OkHttpClient{
class Builder{
fun addInterceptor(Interceptor)
}
fun build(): OkHttpClient = OkHttpClient(this)
}
|
二 retrofit
1
2
3
4
5
6
7
8
9
10
11
12
13
14
15
16
17
18
19
20
21
22
23
24
25
26
27
28
29
30
31
32
33
34
35
36
37
38
39
40
41
42
43
44
45
46
47
48
49
50
51
|
retrofit是对okhttp的封装,底层使用了okhttp,让我们发送网络请求更简单
1 build.gradle中引入retrofit
implementation "com.squareup.retrofit2:retrofit:2.9.0"
2 编写接口,声明网络请求
public interface HttpReq {
@POST("/api/v1/post")
@FormUrlEncoded
Call<ResponseBody> postLogin(@Field("name") String userName, @Field("pwd") String password);
@GET("/api/v2/xxx")
Call<ResponseBody> getInfo(@Query("age") String age);
@POST("/post/users")
Call<ResponseBody> postLoginJson(@Body RequestBody body);
}
3 发送请求
new Thread() {
@Override
public void run() {
Retrofit retrofit = new Retrofit.Builder().baseUrl("http://192.168.1.12:8080/").build();
HttpReq req = retrofit.create(HttpReq.class);
Call<ResponseBody> call = req.postLogin("justin","123");
try {
ResponseBody responseBody = call.execute().body();
String responseString = responseBody.string();
Log.e("Retrofit返回的结果", responseString);
} catch (Exception e) {
e.printStackTrace();
}
}
}.start();
4 简写成
Retrofit retrofit = new Retrofit.Builder().baseUrl("http://192.168.1.12:8080/").build();
try {
ResponseBody responseBody = retrofit.create(HttpReq.class).postLogin("justin","123").execute().body();
String responseString = responseBody.string();
Log.e("Retrofit返回的结果", responseString);
} catch (Exception e) {
e.printStackTrace();
}
|
2.1 实践
HttpReq
1
2
3
4
5
6
7
8
9
10
11
12
13
14
15
16
17
18
| package com.justin.demo;
import okhttp3.ResponseBody;
import retrofit2.Call;
import retrofit2.http.Field;
import retrofit2.http.FormUrlEncoded;
import retrofit2.http.GET;
import retrofit2.http.POST;
import retrofit2.http.Query;
public interface HttpReq {
@POST("/login")
@FormUrlEncoded
Call<ResponseBody> postLogin(@Field("username") String userName, @Field("password") String password, @Field("sign") String sign);
@GET("/film")
Call<ResponseBody> getFilm(@Query("name") String name);
}
|
MainActivity
1
2
3
4
5
6
7
8
9
10
11
12
13
14
15
16
17
18
19
20
21
22
23
24
25
26
27
28
| public void loginForm() {
String username = String.valueOf(txt_user.getText());
String password = String.valueOf(txt_pwd.getText());
String sign = Utils.md5(username + "justin");
Toast t = Toast.makeText(MainActivity.this, "登录成功", Toast.LENGTH_LONG);
new Thread() {
@Override
public void run() {
Retrofit retrofit = new Retrofit.Builder().baseUrl("http://192.168.1.12:8080/").build();
try {
ResponseBody responseBody = retrofit.create(HttpReq.class).postLogin(username,password,sign).execute().body();
String responseString = responseBody.string();
Log.e("Retrofit返回的结果", responseString);
t.show();
} catch (Exception e) {
e.printStackTrace();
}
}
}.start();
}
|
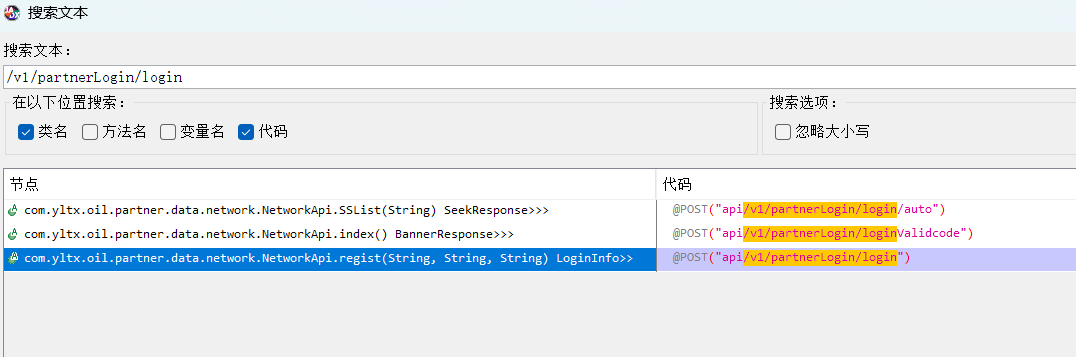
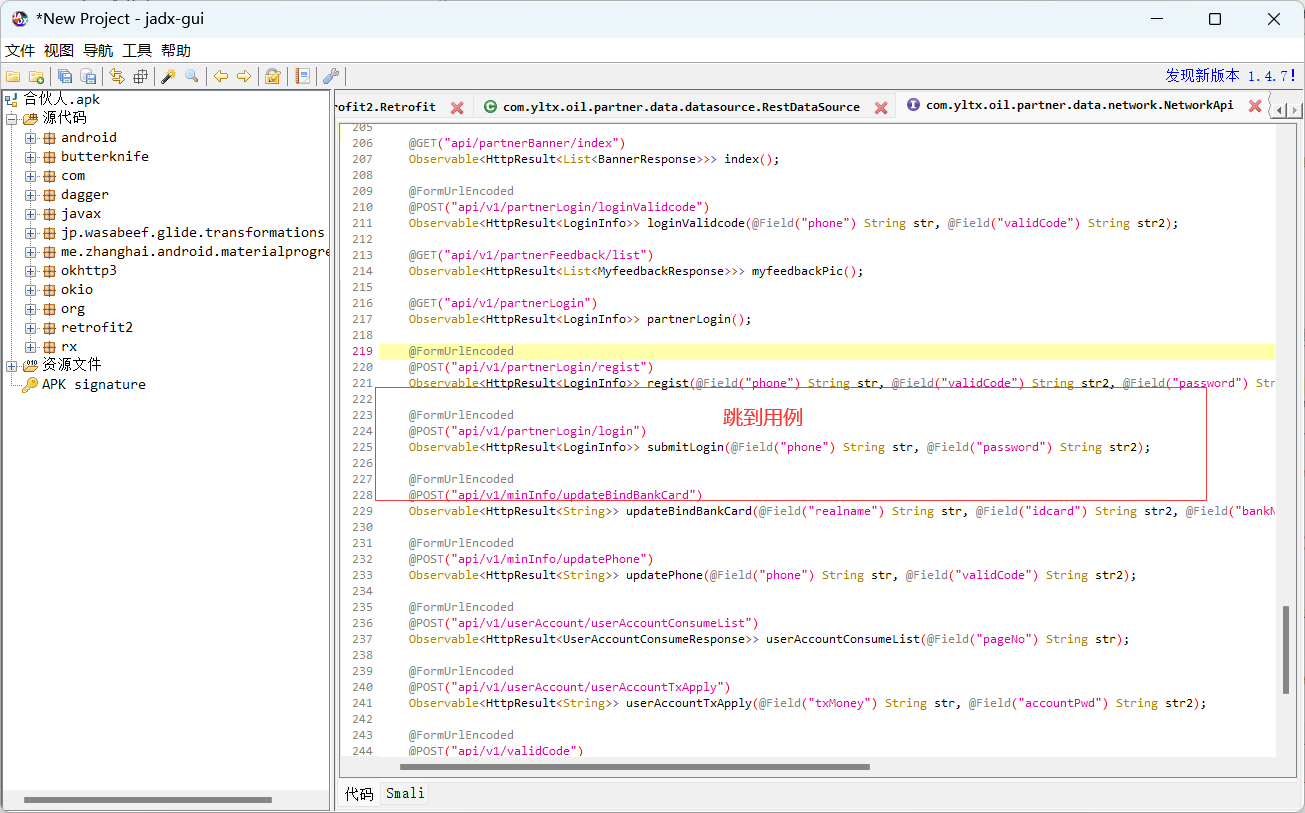
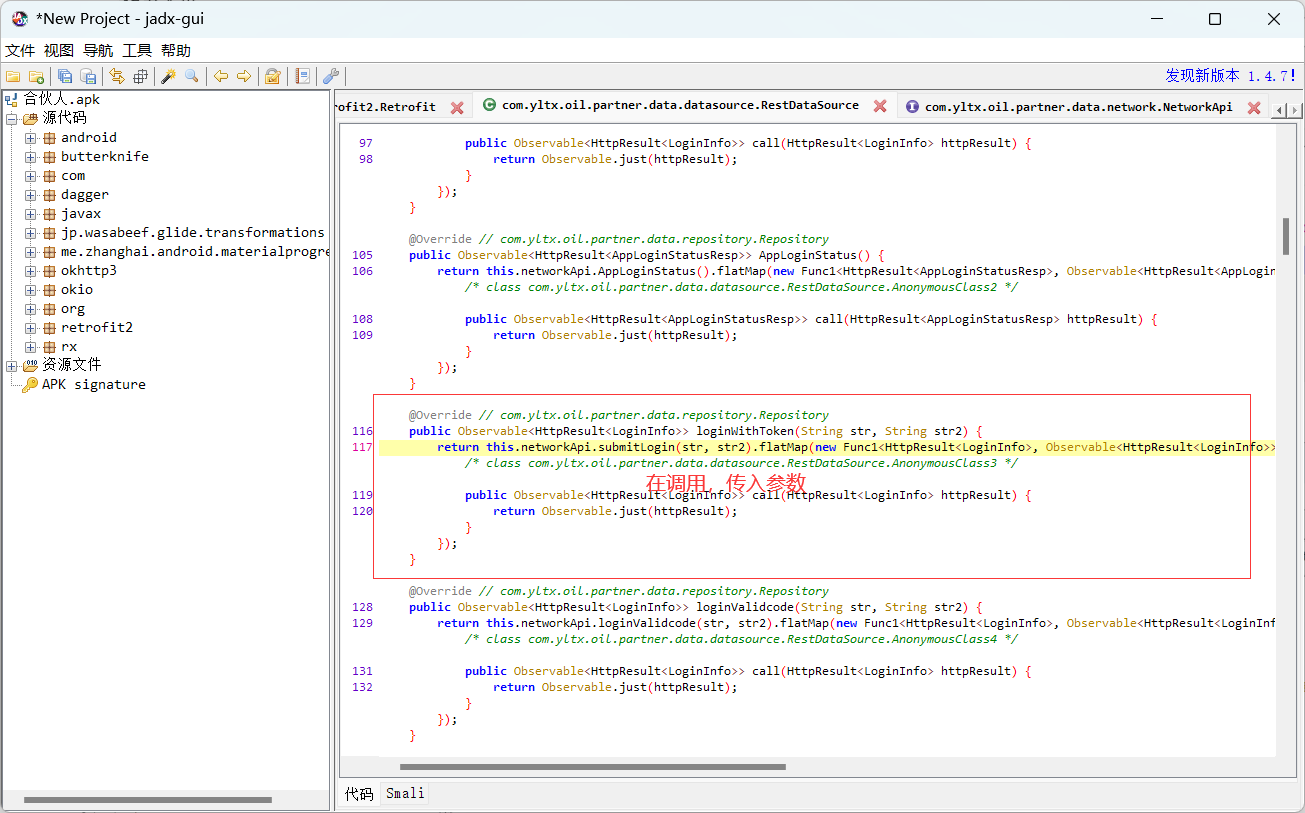
2.2 逆向
1
2
| -1 定位代码:搜索URL,可以定位到接口的位置(除去域名和端口) /login
例如:合伙人app,搜索: /v1/partnerLogin/login
|
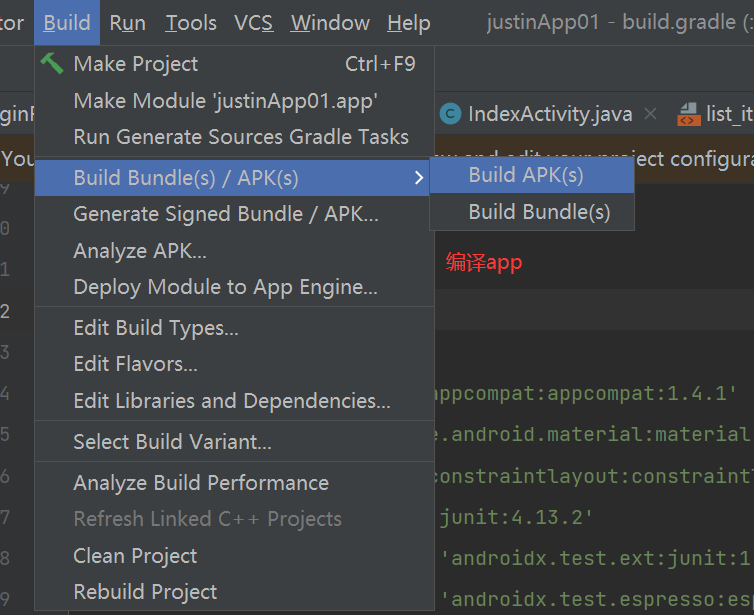
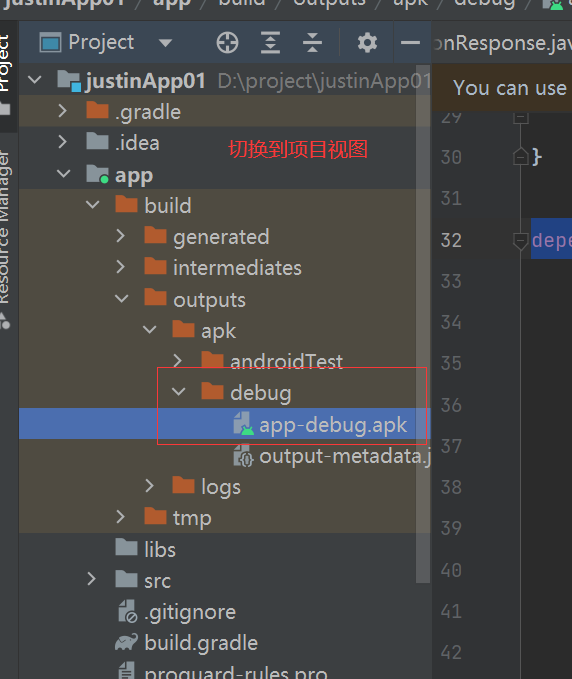
三 逆向自己的app
四 C语言编译器安装
1
2
3
4
5
6
7
8
9
10
11
12
13
14
15
16
17
18
|
一般公司的apk,基于Java实现的加密。
- jadx反编译java,分析代码
NB公司的的apk,基于Java+C语言实现加密(JNI开发)。
- jadx反编译java,分析代码
- ida反编译c语言,分析代码
在C语言中,生成的可执行文件或共享库(.so文件)可以被反汇编和反编译,以还原源代码或了解其实现细节。下面是一些常用的C语言so文件反编译工具:
IDA Pro:IDA Pro是一款强大的逆向工程工具,支持多种平台和架构,包括C语言。它提供了反汇编、反编译、调试等功能,能够帮助你还原C语言so文件的源代码。但需要注意的是,IDA Pro是商业软件,需要购买授权。
Ghidra:Ghidra是一款由美国国家安全局(NSA)开发的开源逆向工程工具。它支持多种平台和架构,并提供反汇编、反编译、脚本编写等功能,可以用于分析和还原C语言so文件的代码。
Radare2:Radare2是一个开源的逆向工程框架,提供了反汇编、反编译、调试等功能。它可以用于分析和还原C语言so文件的源代码,支持多种平台和架构。
Hopper Disassembler:Hopper Disassembler是一款反汇编工具,支持多种平台和架构。它可以将C语言so文件反汇编为汇编代码,并提供可视化界面和一些高级分析功能。
|
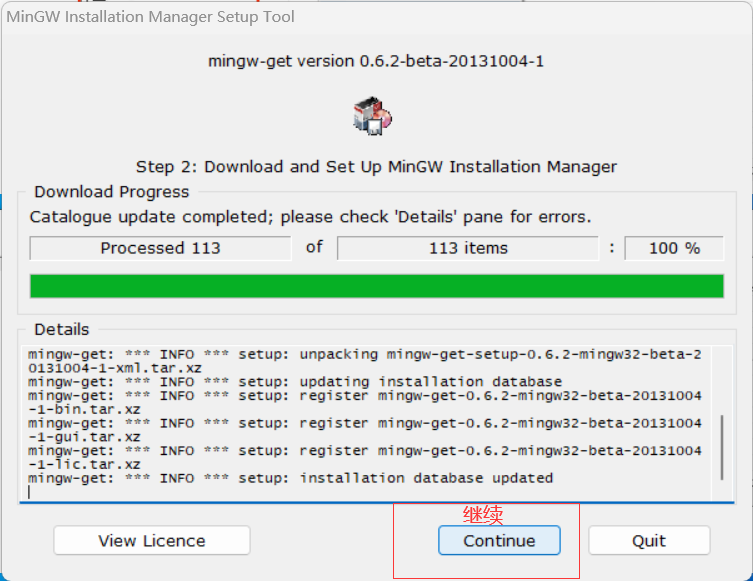
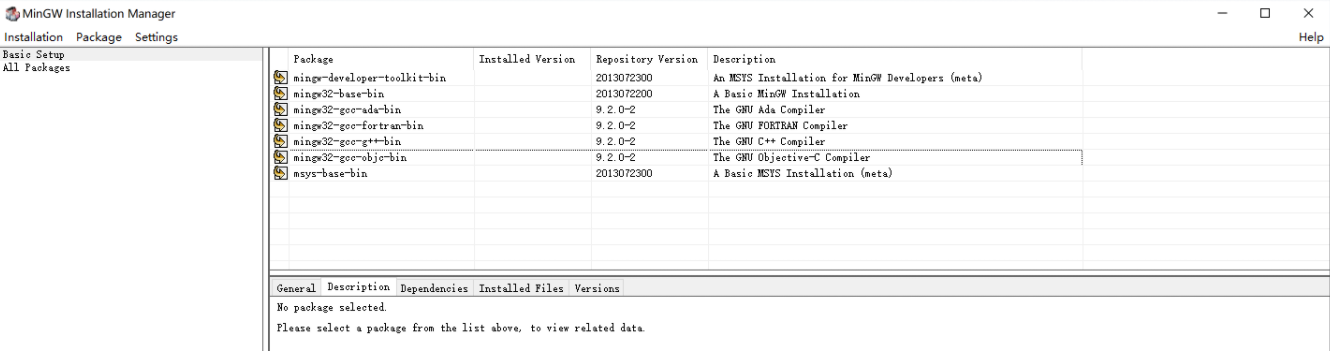
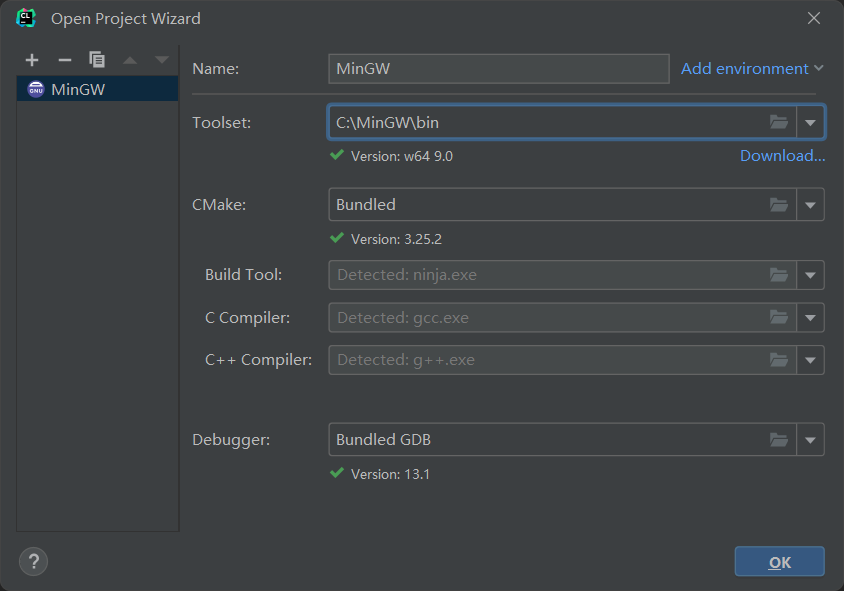
4.1 编译器安装
1
2
3
4
5
6
7
8
9
10
11
12
13
14
15
16
17
18
19
20
21
22
23
24
25
26
27
28
29
30
31
32
33
34
35
36
37
38
39
40
|
xcode: https://developer.apple.com/xcode/
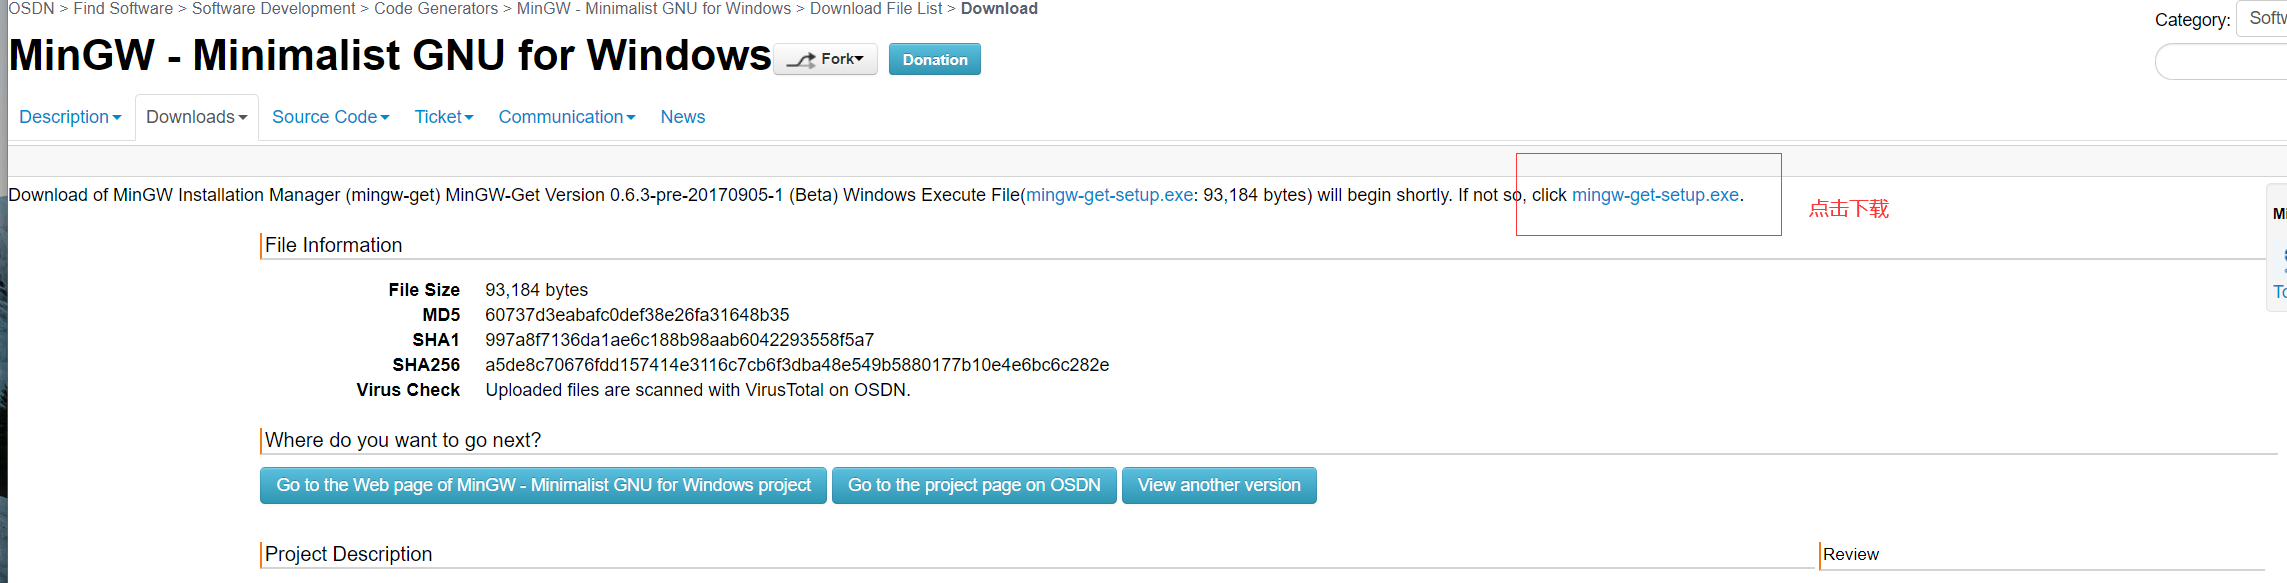
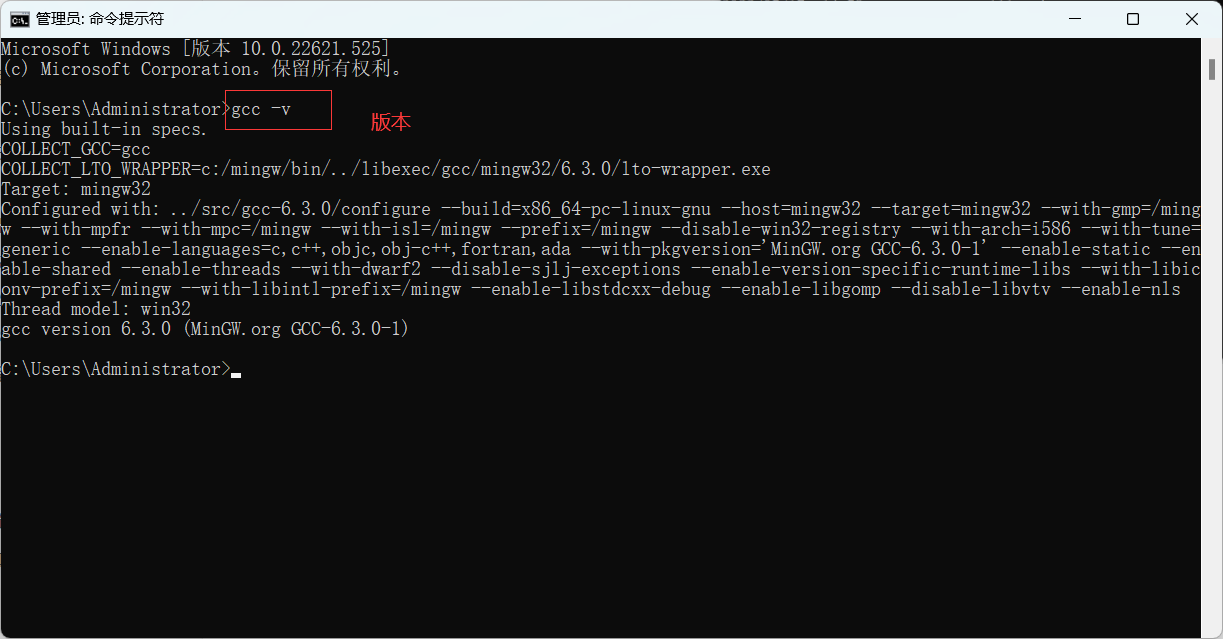
MInGW全称为:Minimalist GNU on Windows.将经典的开源C语言编译器GCC移植到了Windows平台下,并且包含了Win32API,因此可以将源代码编译为在Windows中运行的可执行程序
而且还可以使用一些Windows不具备的,Linux平台下的开发工具。概括来讲:MinGW 是GCC的Windows版本
MinGW只能编译生产32位可执行程序;
MinGW-w64可以编译成64bit或者32bit可执行程序
https://zhuanlan.zhihu.com/p/355510947
https://sourceforge.net/projects/mingw-w64/files/mingw-w64/mingw-w64-release/
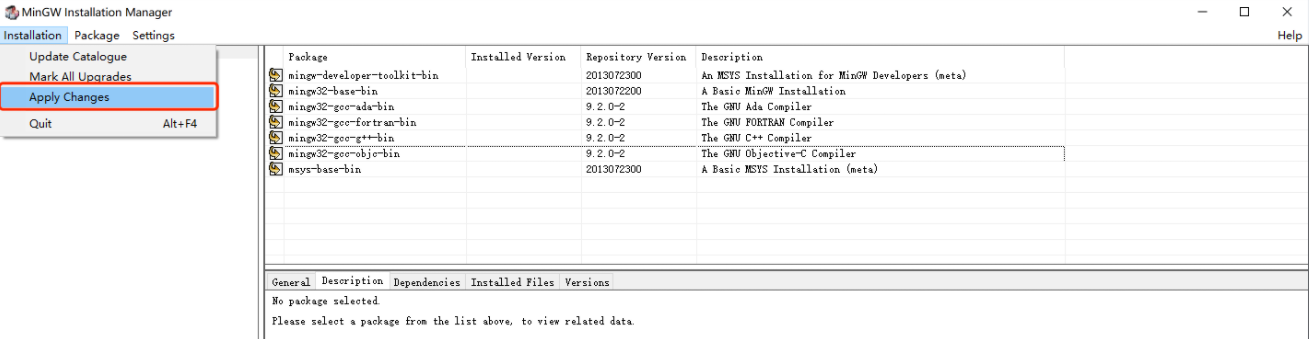
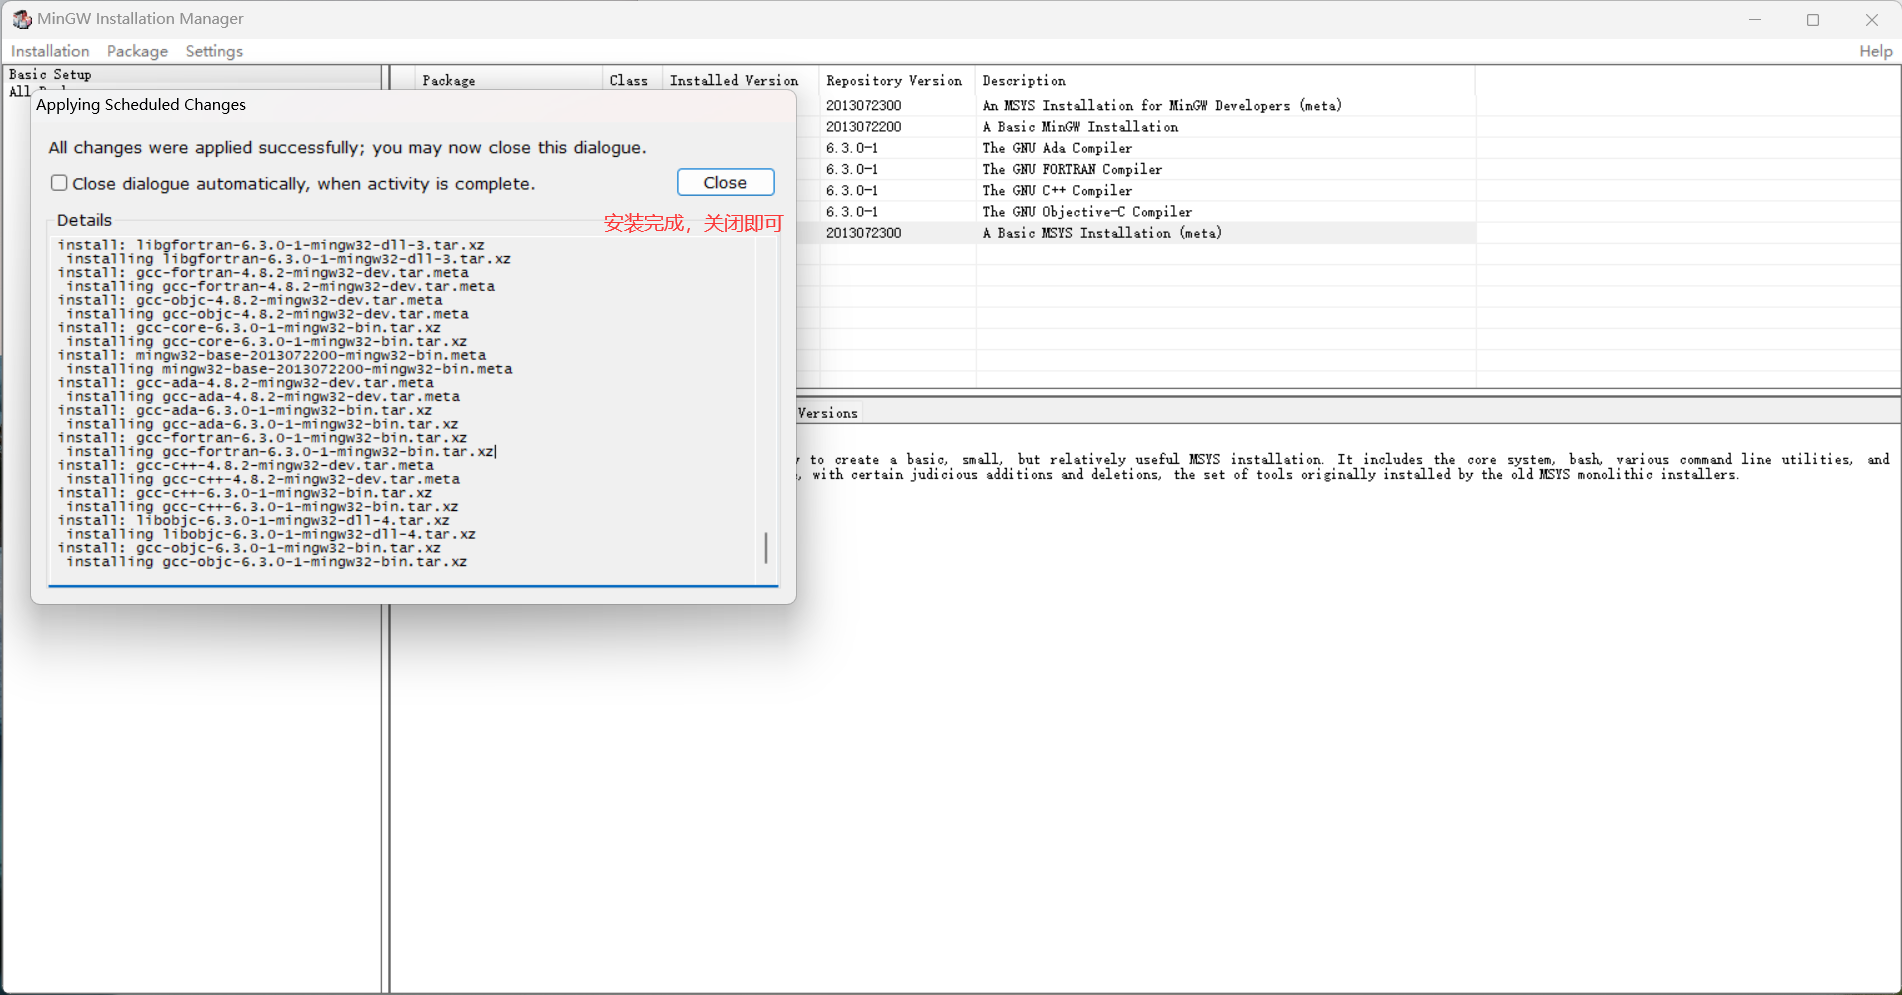
-下载:https://osdn.net/projects/mingw/downloads/68260/mingw-get-setup.exe/
-下载不成功,用这个地址:https://sourceforge.net/projects/mingw/files/latest/download
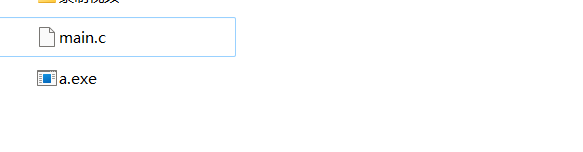
int main(int argc, char const *argv[]) {
printf("hello world\n");
return 0;
}
gcc main.c
a.exe
|


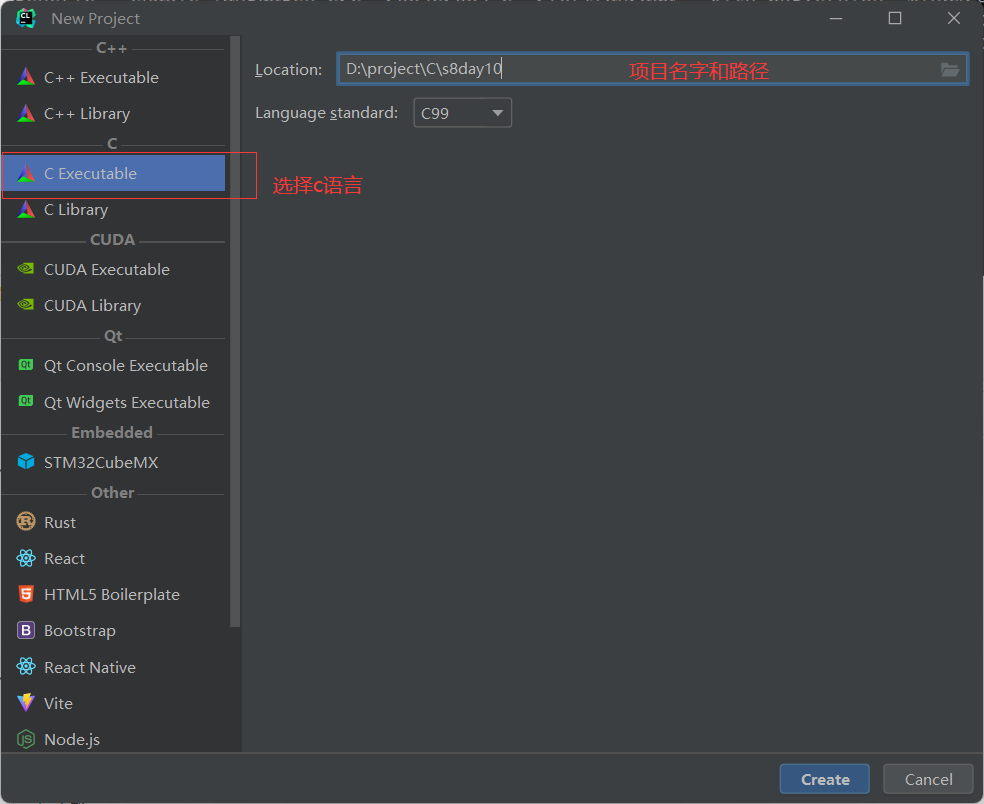
4.2 IDE安装
1
2
3
4
5
|
https://www.jetbrains.com/clion/download/other.html
|

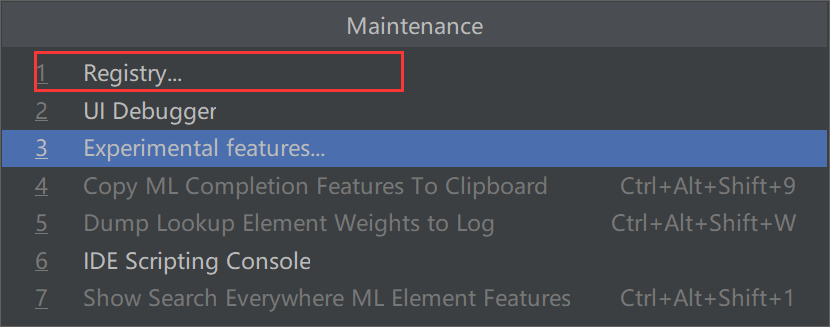
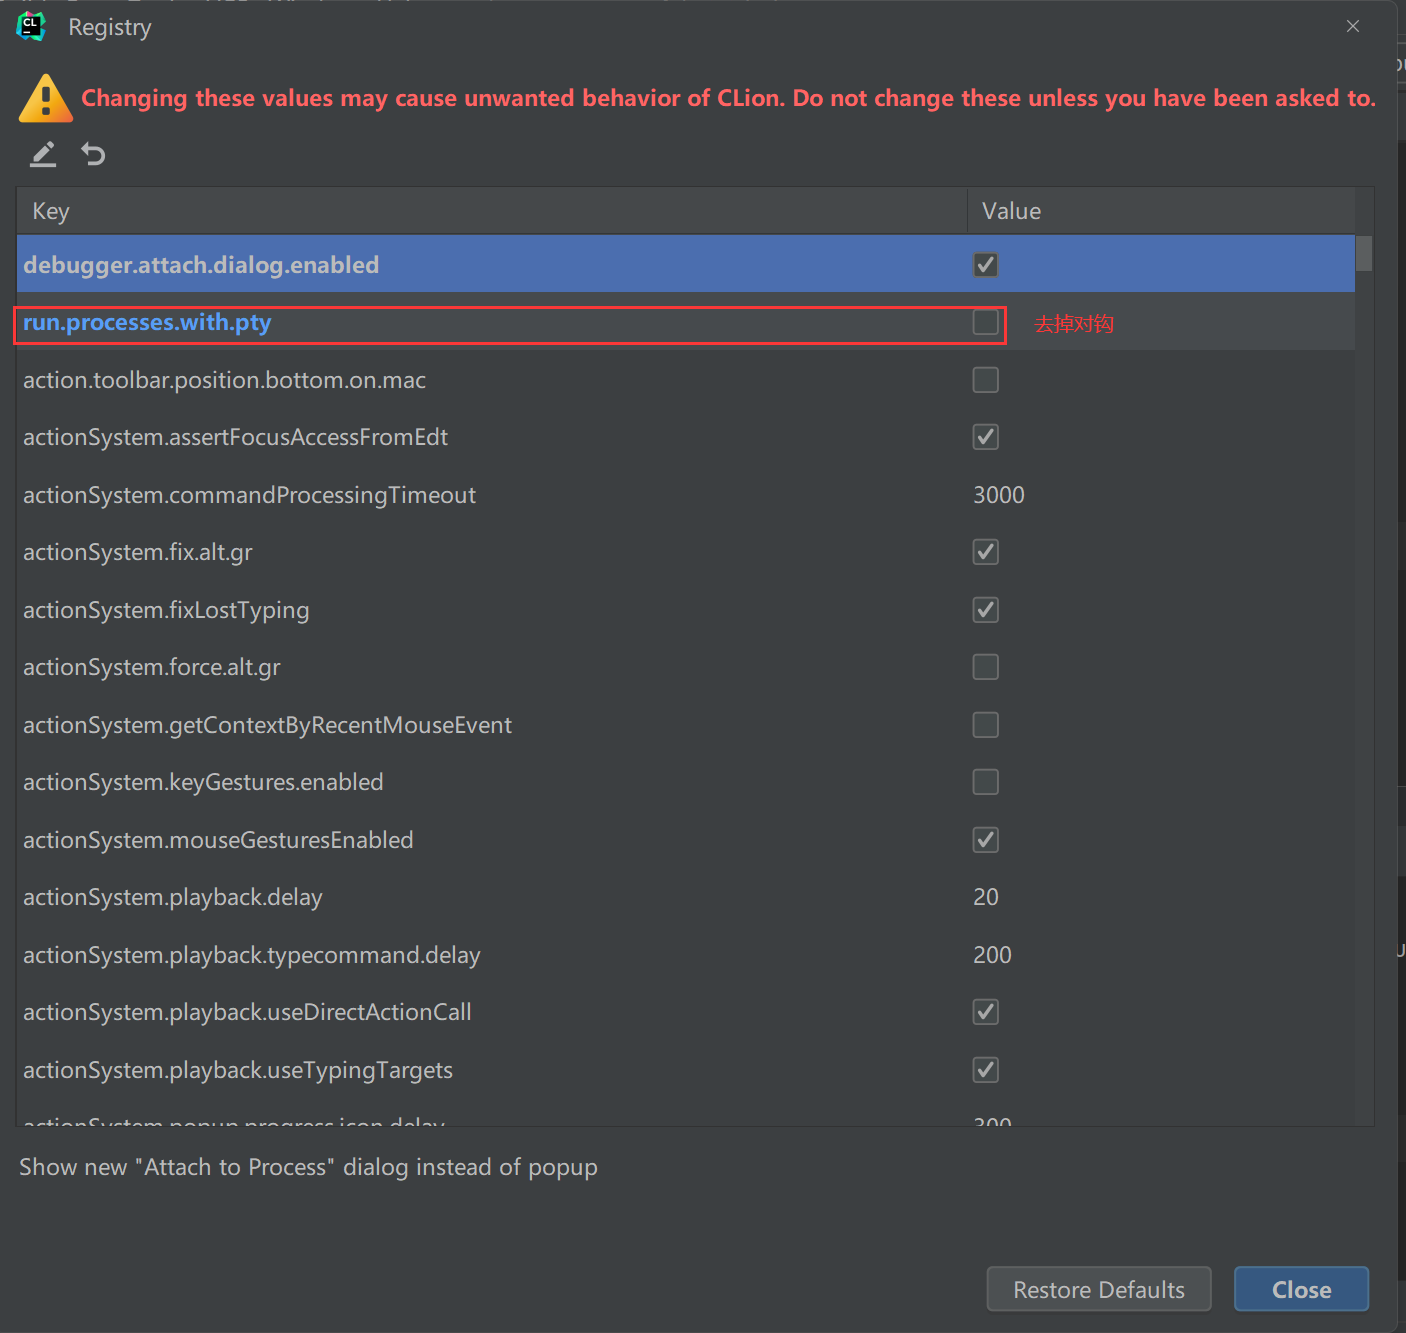
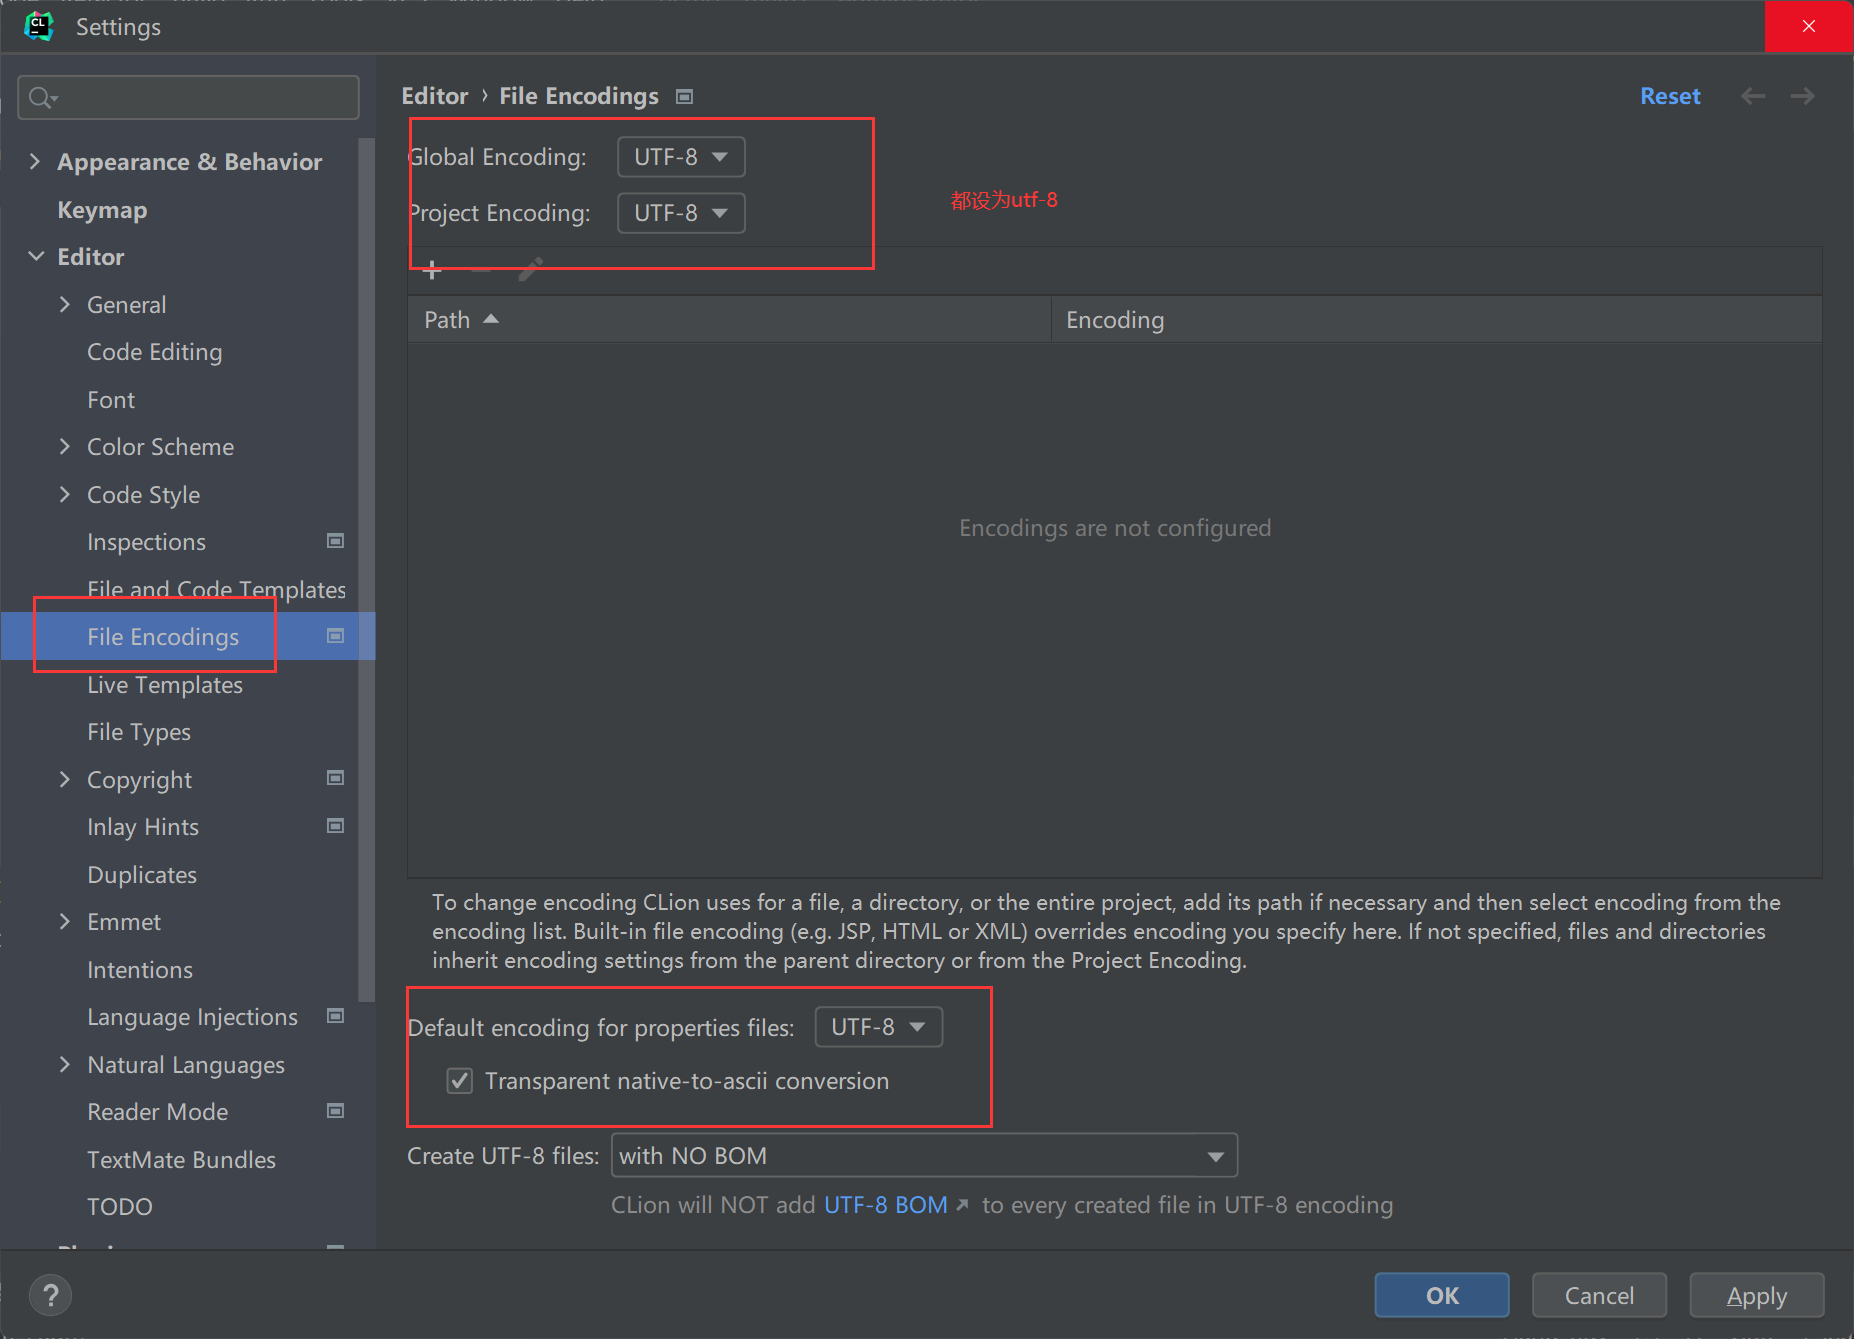
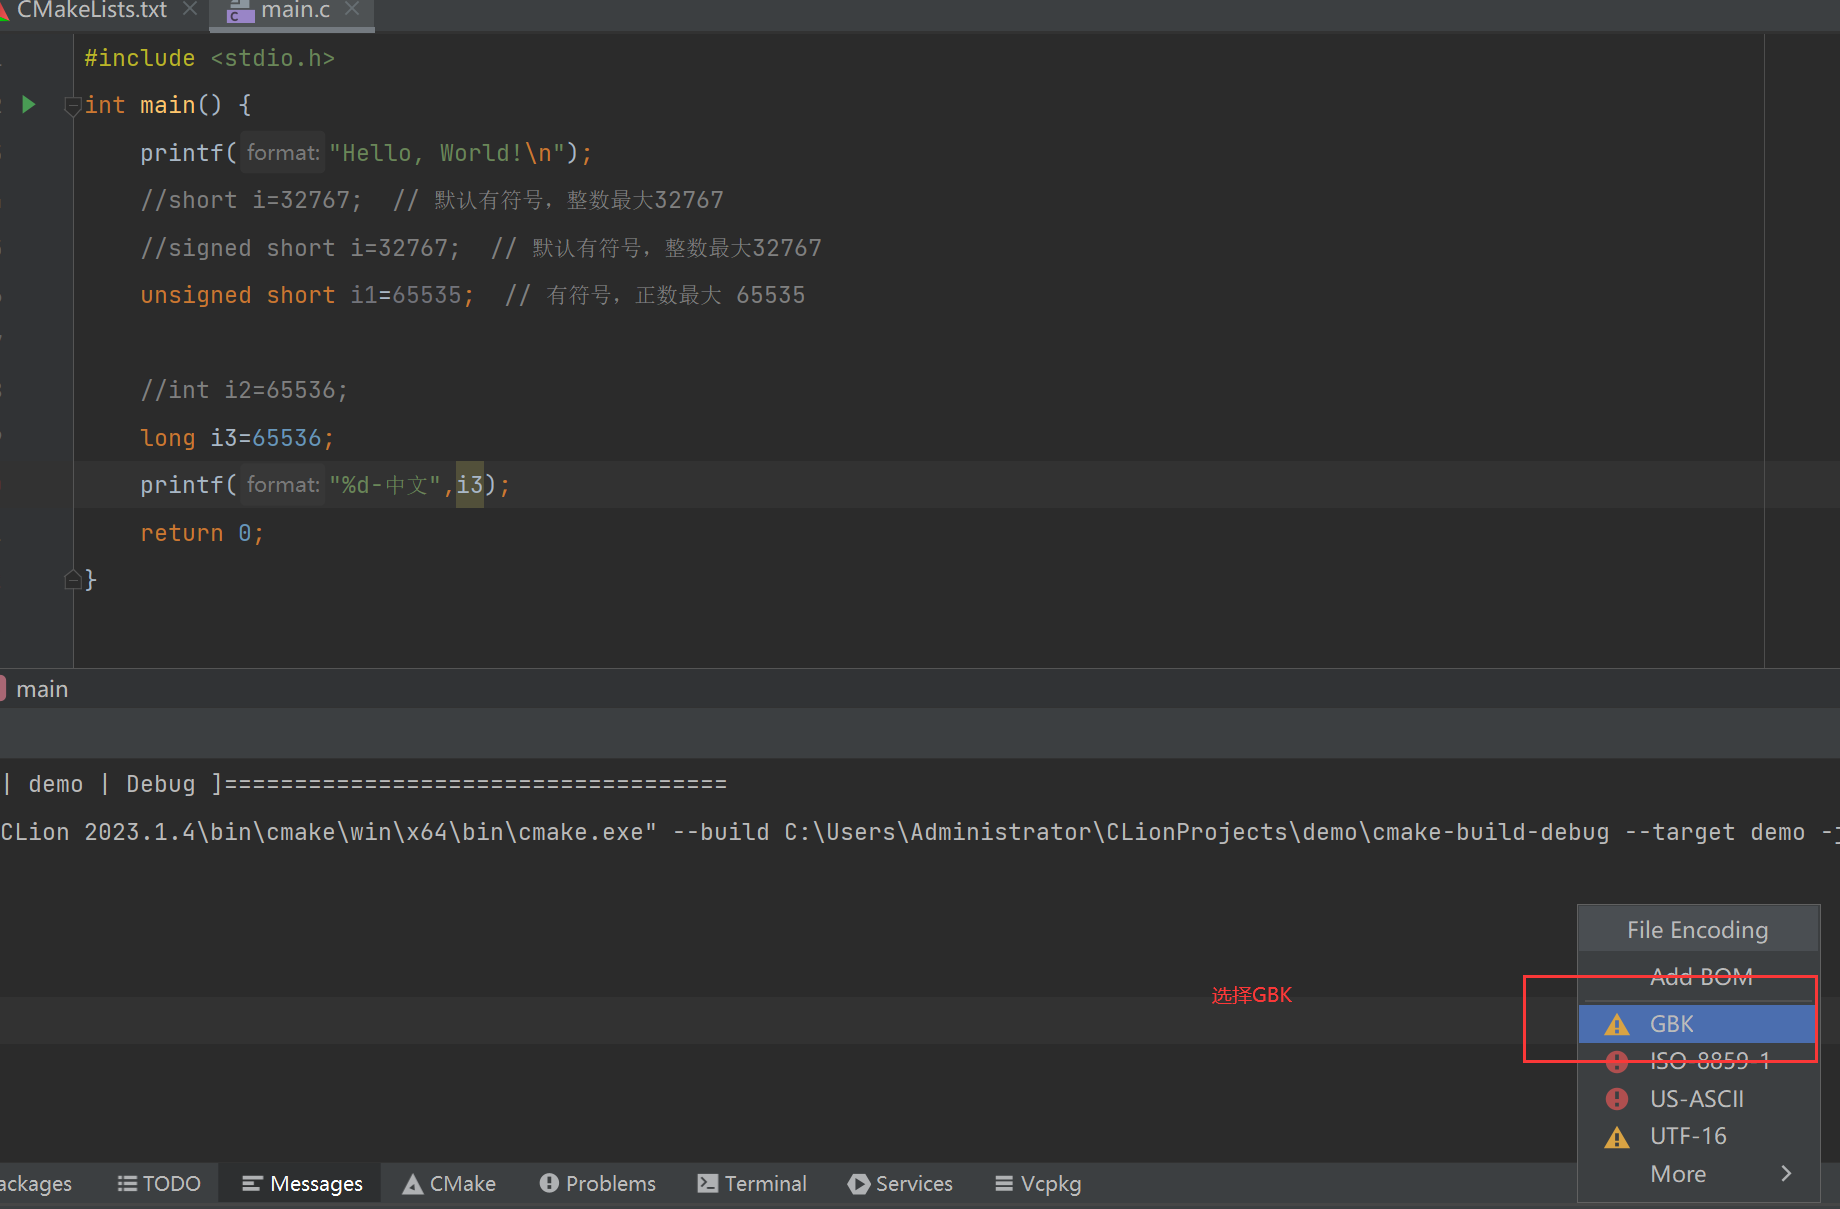
4.3 clion中文乱码问题
4.3.1 解决方案一
1
| 按住 Ctrl+Shift+Alt+/ 选中Registry...
|
4.3.2 解决方案二
五 基础语法
5.1 整形
| 类型 |
存储大小 |
值范围 |
| char |
1 字节 |
-128 到 127 或 0 到 255 |
| unsigned char |
1 字节 |
0 到 255 |
| signed char |
1 字节 |
-128 到 127 |
| int |
2 或 4 字节 |
-32,768 到 32,767 或 -2,147,483,648 到 2,147,483,647 |
| unsigned int |
2 或 4 字节 |
0 到 65,535 或 0 到 4,294,967,295 |
| short |
2 字节 |
-32,768 到 32,767 |
| unsigned short |
2 字节 |
0 到 65,535 |
| long |
4 字节 |
-2,147,483,648 到 2,147,483,647 |
| unsigned long |
4 字节 |
0 到 4,294,967,295 |
1
2
3
4
5
6
7
8
9
10
11
12
13
14
15
16
17
18
19
20
21
22
23
24
| #include <stdio.h>
int main() {
char i=99;
printf("%d\n",i);
printf("%c\n",i);
unsigned char i1=99;
printf("%d\n",i1);
printf("%c\n",i1);
unsigned short i1=65535;
long i3=65536;
printf("%d",i3);
int i9=9999;
printf("%d\n",sizeof(i9));
printf("%d\n",sizeof(int));
return 0;
}
|
5.2 浮点型
| 类型 |
存储大小 |
值范围 |
精度 |
| float |
4 字节 |
1.2E-38 到 3.4E+38 |
6 位有效位 |
| double |
8 字节 |
2.3E-308 到 1.7E+308 |
15 位有效位 |
| long double |
16 字节 |
3.4E-4932 到 1.1E+4932 |
19 位有效位 |
1
2
3
4
5
6
7
8
9
10
11
12
13
14
15
16
17
| #include <stdio.h>
int main() {
printf("float 存储最大字节数 : %d \n", sizeof(float));
printf("double 存储最大字节数 : %d \n", sizeof(double));
printf("long double 存储最大字节数 : %d \n", sizeof(long double));
float f1=365.123456789F;
printf("%f---%e\n",f1,f1);
double f2=365.123456789;
printf("%f---%e\n",f2,f2);
long double f3=365.123456789L;
printf("%Lf---%Le\n",f3,f3);
return 0;
}
|
5.3 常量
1
2
3
4
5
6
7
| #include <stdio.h>
int main() {
const int MAX_VALUE =99;
printf("%d\n",MAX_VALUE );
return 0;
}
|
5.4 运算符
A 的值为 10,变量 B 的值为 20
| 运算符 |
描述 |
实例 |
| + |
把两个操作数相加 |
A + B 将得到 30 |
| - |
从第一个操作数中减去第二个操作数 |
A - B 将得到 -10 |
| * |
把两个操作数相乘 |
A * B 将得到 200 |
| / |
分子除以分母 |
B / A 将得到 2 |
| % |
取模运算符,整除后的余数 |
B % A 将得到 0 |
| ++ |
自增运算符,整数值增加 1 |
A++ 将得到 11 |
| – |
自减运算符,整数值减少 1 |
A– 将得到 9 |
1
2
3
4
5
6
7
8
9
10
11
12
13
14
15
16
17
18
19
20
21
22
23
24
| #include <stdio.h>
int main() {
int a = 10;
int b = 20;
int c;
c = a + b;
printf("a+b结果是 %d\n", c);
c = a - b;
printf("a-b结果是 %d\n", c);
c = a * b;
printf("a * b 结果是%d\n", c);
c = b / a;
printf("b / a的值是 %d\n", c);
c = 10 % 3;
printf("10 % 3取整除的值是 %d\n", c);
c = a++;
printf("赋值后再加 的值是 %d,a的值为:%d\n", c, a);
c = a--;
printf("赋值后再减 1的值是 %d,a的值为:%d\n", c, a);
return 0;
}
|
| 运算符 |
描述 |
| == |
检查两个操作数的值是否相等,如果相等则条件为真。 |
| != |
检查两个操作数的值是否相等,如果不相等则条件为真。 |
| > |
检查左操作数的值是否大于右操作数的值,如果是则条件为真。 |
| < |
检查左操作数的值是否小于右操作数的值,如果是则条件为真。 |
| >= |
检查左操作数的值是否大于或等于右操作数的值,如果是则条件为真。 |
| <= |
检查左操作数的值是否小于或等于右操作数的值,如果是则条件为真。 |
| 运算符 |
描述 |
| && |
称为逻辑与运算符。如果两个操作数都非零,则条件为真。 |
| || |
称为逻辑或运算符。如果两个操作数中有任意一个非零,则条件为真。 |
| ! |
称为逻辑非运算符。用来逆转操作数的逻辑状态。如果条件为真则逻辑非运算符将使其为假。 |
1
2
3
4
5
6
7
8
9
10
11
12
| #include <stdio.h>
#include <stdbool.h>
int main() {
bool isTrue = true;
int a = 10;
int b = 20;
if (a && b) {
printf("条件为真\n");
}
return 0;
}
|
| 运算符 |
描述 |
| = |
简单的赋值运算符,把右边操作数的值赋给左边操作数 |
| += |
加且赋值运算符,把右边操作数加上左边操作数的结果赋值给左边操作数 |
| -= |
减且赋值运算符,把左边操作数减去右边操作数的结果赋值给左边操作数 |
| *= |
乘且赋值运算符,把右边操作数乘以左边操作数的结果赋值给左边操作数 |
| /= |
除且赋值运算符,把左边操作数除以右边操作数的结果赋值给左边操作数 |
| %= |
求模且赋值运算符,求两个操作数的模赋值给左边操作数 |
| <<= |
左移且赋值运算符 |
| >>= |
右移且赋值运算符 |
| &= |
按位与且赋值运算符 |
1
2
3
4
5
6
7
8
9
10
| #include <stdio.h>
int main() {
int a = 21;
int c;
c += a;
printf("%d\n", c);
c *= a;
printf("%d\n", c);
return 0;
}
|
| 运算符 |
描述 |
实例 |
| sizeof() |
返回变量的大小。 |
sizeof(a) 将返回 4,其中 a 是整数。 |
| & |
返回变量的地址。 |
&a; 将给出变量的实际地址。 |
| * |
指向一个变量。 |
*a; 将指向一个变量。 |
| ? : |
条件表达式 |
如果条件为真 ? 则值为 X : 否则值为 Y |
1
2
3
4
5
6
7
8
9
10
11
12
13
14
15
16
17
18
19
| #include <stdio.h>
#include <stdbool.h>
int main() {
int a = 4;
printf("%d\n", sizeof(a));
int *ptr = &a;
printf("a 的值是 %d,ptr的值是%p\n", a, ptr);
a = 10;
int b = (a == 1) ? 20 : 30;
printf("b 的值是 %d\n", b);
return 0;
}
|
5.5 if 判断
1
2
3
4
5
6
7
8
9
10
11
12
13
14
15
16
17
18
| #include <stdio.h>
#include <stdbool.h>
int main() {
int num;
printf("输入一个数字 : ");
scanf("%d", &num);
if (num > 90) {
printf("优秀");
} else if (num > 60 && num < 90) {
printf("及格");
} else {
printf("不及格");
}
return 0;
}
|
5.6 循环
| 循环类型 |
描述 |
| while 循环 |
当给定条件为真时,重复语句或语句组。它会在执行循环主体之前测试条件。 |
| for 循环 |
多次执行一个语句序列,简化管理循环变量的代码。 |
| do…while 循环 |
除了它是在循环主体结尾测试条件外,其他与 while 语句类似。 |
1
2
3
4
5
6
7
8
9
10
11
12
13
14
15
16
17
18
19
20
21
22
23
24
25
26
27
28
29
30
| #include <stdio.h>
#include <stdbool.h>
int main() {
int num = 0;
for (; ; ) {
printf("我是死循环");
};
return 0;
}
|
5.7 函数
1
2
3
4
| 返回值类型 函数名( 参数类型 形参 )
{
函数体;
}
|
1
2
3
4
5
6
7
8
9
10
11
12
13
14
| #include <stdio.h>
int add(int a, int b) {
return a + b;
}
int main() {
int a = add(10, 10);
printf("%d", a);
return 0;
}
|
5.8 字符和字符串
在C语言中没有字符串。
用 字符数组 创造出字符串出来(每个字符占1个字节)。
1
2
3
4
5
6
7
8
9
10
11
12
13
14
| #include <stdio.h>
int main() {
char a = 'a';
printf("%c\n", a);
char s[]="justin";
char s1[]= {'j','u','s','t','i','n','\0'};
printf("%s\n", s);
printf("%s\n", s1);
return 0;
}
|
5.9 数组
对于数组来说,内部元素是挨个存放,内存地址相邻。
它可以存储一个固定大小的相同类型元素的顺序集合。数组是用来存储一系列数据,是一系列相同类型的变量
1
2
| char v2[]= {'j','u','s','t','i','n','\0'};
int v3[3] = {11,22,33};
|
- 元素固定
- 类型固定(每个元素在内存中占据长度相同)
1
2
3
4
5
6
7
8
9
10
11
12
13
14
15
16
17
18
19
20
21
22
| #include <stdio.h>
int main() {
char v3[] = "justin";
printf("第0个位置值:%c,内存地址:%p \n", v3[0], &v3[0]);
printf("第1个位置值:%c,内存地址:%p \n", v3[1], &v3[1]);
printf("第2个位置值:%c,内存地址:%p \n", v3[2], &v3[2]);
int a[]={1,2,3};
printf("%d\n",a[0]);
printf("%d\n",a[1]);
printf("%d\n",a[2]);
printf("%d",sizeof(a) / sizeof(a[0]));
return 0;
}
|
1
2
3
4
5
6
7
8
9
| # include <stdio.h>
int main() {
int v3[] = {11, 22, 33, 44, 55, 66};
printf("第0个位置值:%d,内存地址:%p \n", v3[0], &v3[0]);
printf("第1个位置值:%d,内存地址:%p \n", v3[1], &v3[1]);
printf("第2个位置值:%d,内存地址:%p \n", v3[2], &v3[2]);
return 0;
}
|
__END__
