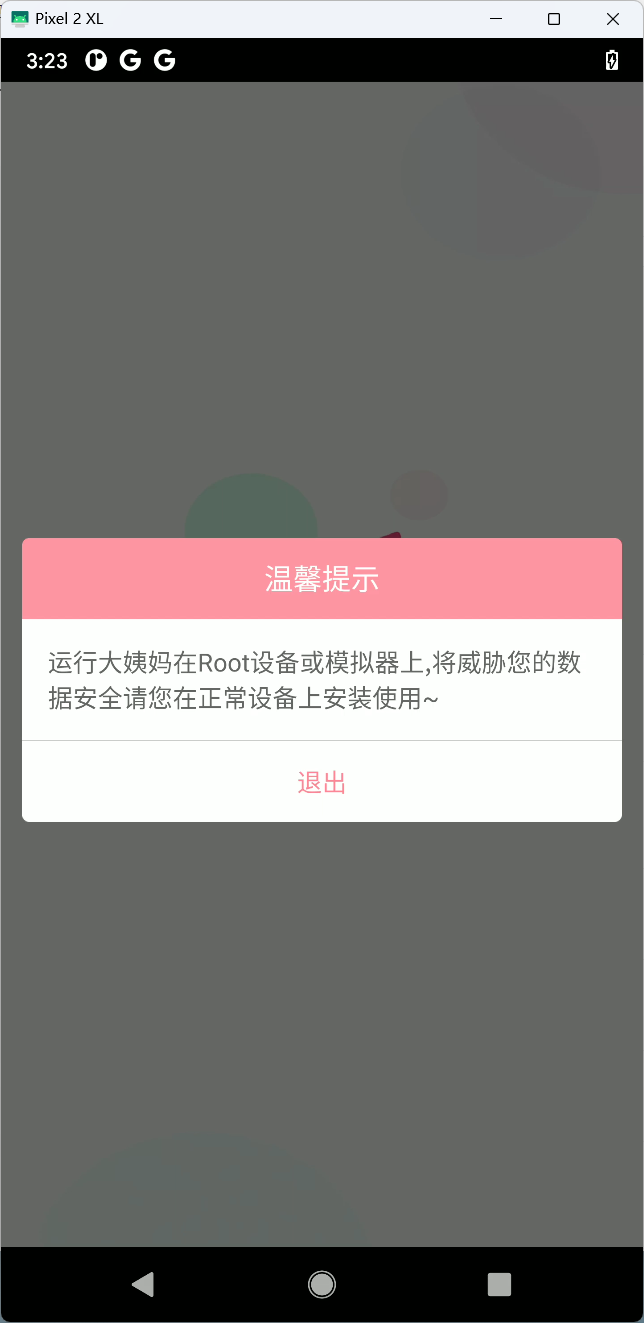
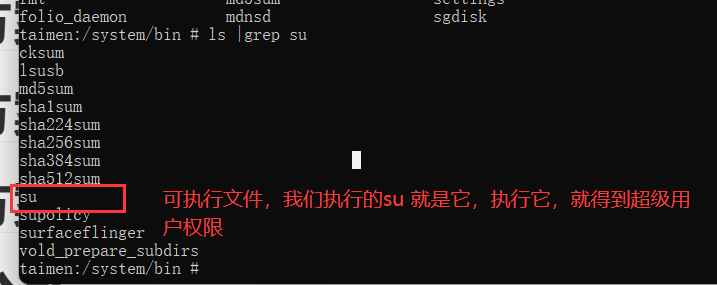
今日内容

1 今日目标

1
2
3
4
5
6
7
8
9
10
11
12
# 大姨妈app
# 破解登录
# 版本:v8.6.0
# 学习到到的
1 root检测和绕过--(银行类的app)
2 frida-rpc使用--(硬破so文件,调用传入该传的参数,把结果跑出来的)
3 基于别人的so文件,自己写apk调用---(原来硬破so文件,通过自己写apk,主动调用)

# 把大姨妈apk安装到手机
adb install 大姨妈v8.6.0.apk

# 打开大姨妈apk,由于咱们手机root了,一打开软件,提示 手机被root了,只能强制退出,进不到登录页面

2 Root检测和绕过方案

image-20240517182816504

2.1 root检测原理

1
2
3
4
5
6
7
8
9
10
11
12
13
14
15
16
17
18
19
20
21
22
23
24
25
26
27
28
29
30
31
32
33
34
35
# 检测原理---》运行app--》app会用代码去固定位置检查,当前位置下有没有su 命令,如果有,说明手机root了
# 检测原理---》root的手机,会有一些特征:典型的特征就是 su 命令
# 我们使用的root工具是:面具,superuser.apk--->每个软件都有不同特征

# 只要手机root了,会在如下目录出现特殊的标识
"/system/bin/su", # 不同root软件,生成的位置不同,面具一般在这个目录下
"/data/local/bin/su",
"/data/local/su",
"/data/local/xbin/su",
"/sbin/su",
"/system/app/Superuser.apk",
"/system/bin/failsafe/su",
"/su/bin/su",
"/system/sd/xbin/su",
"/system/xbin/busybox",
"/system/xbin/daemonsu",
"/system/xbin/su",
"/system/sbin/su",

# 我们查看手机是否必备root,直接进入:/system/bin 看看有没有su可执行文件
adb shell # 进入到手机
su # 获得超级用户权限
/system/bin # 进入到目录下
ls # 查看当前目录下的文件或文件夹
ls | grep su # 查看当前目录下 名字中包含 su 的 文件或文件夹


# app 有没有权限检测这些目录?
app有这些权限


# 知道了检测原理,绕过
1 反编译apk,找到检测代码--》hook,让它不执行---》绕过强制跟新一样
2 通过修改 su 可执行文件的名字
aosp 刷机并root,修改su文件名 su1

image-20240517182829537

2.2 绕过方案一

1
2
3
4
5
6
7
8
9
10
11
12
13
14
15
16
17
18
19
# 网上别人开源的通用绕过方案:针对于所有app,就是hook方案,借助于 frida-server
# https://github.com/AshenOneYe/FridaAntiRootDetection

# 这个通用脚本的原理就是 通过hook底层,让app,去检测对应文件的时候,让它检测不到---》hook方案

# 使用步骤:
1 复制 https://github.com/AshenOneYe/FridaAntiRootDetection/blob/main/antiroot.js
2 手机端启动frida-server,端口转发
3 运行这个js脚本:
frida -U -f com.yoloho.dayima -l hook.js


# 以后所有app,只需要改app的名字即可
frida -U -f app包名 -l hook.js


# 有没有绕过 模拟器检测 统一脚本
1 网上会有人写
2 咱们一会也要写hook绕过

2.3 绕过方案二

1
2
3
4
5
6
7
8
9
10
11
12
13
14
15
16
17
####  面具+Shamiko模块方案+隐藏magisk应用
-原来隐藏su文件,让某款app检测不到

# 使用步骤:
1 把老师提供的 Shamiko-v0.5.2-120-release.zip 推送到手机上
adb push Shamiko-v0.5.2-120-release.zip /sdcard/Download/Shamiko-v0.5.2-120-release.zip

2 打开面具---模块--》本地安装---》把zip刷入--》重启--》再进来--》打开

3 打开面具--》首页--》右上角齿轮点击---》配置排除列表--》把大姨妈app排除

4 打开app,就没有提示了


# 补充:有银行类的app,不仅仅做root检测,还做面具检测--》看看你手机上有没有装面具--》装了面具也不允许进入app【大姨妈没有这个】


image-20240517182844290

image-20240517182854320

image-20240517182905099

image-20240517182916792

image-20240517182927154

image-20240517182938823

image-20240517182949354

image-20240517182959064

2.4 绕过方案三

1
2
3
4
5
6
7
8
9
10
11
12
13
14
15
16
17
18
19
20
21
22
23
24
25
26
27
28
29
30
31
32
33
34
35
36
37
38
39
40
41
42
43
44
45
46
47
48
49
50
51
52
53
54
55
56
57
58
59
60
61
62
63
64
65
66
67
68
69
70
71
72
73
74
75
76
77
78
79
80
81
82
83
84
85
86
87
88
89
90
91
92
93
94
## 自己使用反编译+hook绕过--》定位代码--》自己hook即可

# 1 反编译app
# 2 搜索 威胁您
private void isRootPhone() {
if (!MiscUtil.isSimulator(this) && !MiscUtil.isRooted()) {
initVariables();
if (NetUtil.getSharedPreferences(SettingsConfig.KEY_USER_PERMISSION, false)) {
ScreenAdLoader.pullSSPAd(true);
return;
}
return;
}
DialogFactory dialogFactory = new DialogFactory((Context) this, "温馨提示", "运行大姨妈在Root设备或模拟器上,将威胁您的数据安全请您在正常设备上安装使用~", false, new DialogCallBack() { // from class: com.yoloho.dayima.activity.core.Launcher.2
@Override // com.yoloho.controller.dialog.customdialog.DialogCallBack
public void negativeOnClickListener() {
}

@Override // com.yoloho.controller.dialog.customdialog.DialogCallBack
public void positiveOnClickListener() {
Launcher.this.finish();
}

@Override // com.yoloho.controller.dialog.customdialog.DialogCallBack
public void titleRightOnClickListener() {
}
});
dialogFactory.setCancel(false);
dialogFactory.setNamePositiveButton("退出");
dialogFactory.show();


#3 核心原理
# 检测是否是模拟器
MiscUtil.isSimulator(this)
# 检测是否root
MiscUtil.isRooted()
# hook,他俩,返回false,就可绕过


# 4 MiscUtil.isSimulator(this) 是否是模拟设备
# 查看Build文件中,有没有一些虚拟设备的关键词
# 查看这个文件:/system/build.prop
# cat /system/build.prop
public static boolean isSimulator(Context context) {
return Build.FINGERPRINT.startsWith("generic") || Build.FINGERPRINT.toLowerCase().contains("vbox") || Build.FINGERPRINT.toLowerCase().contains("test-keys") || Build.MODEL.contains("google_sdk") || Build.MODEL.contains("Emulator") || Build.MODEL.contains("MuMu") || Build.MODEL.contains("virtual") || Build.SERIAL.equalsIgnoreCase("android") || Build.MANUFACTURER.contains("Genymotion") || (Build.BRAND.startsWith("generic") && Build.DEVICE.startsWith("generic")) || "google_sdk".equals(Build.PRODUCT) || ((TelephonyManager) context.getSystemService(AliyunLogCommon.TERMINAL_TYPE)).getNetworkOperatorName().toLowerCase().equals("android");
}


# 5 MiscUtil.isRooted() 是否root
# 去/system/xbin/", "/system/bin/", "/system/sbin/", "/sbin/", "/vendor/bin/", "/su/bin/这些目录下看看有没有su文件,如果有,就返回true,没有就返回false
public static boolean isRooted() {
String[] strArr = {"/system/xbin/", "/system/bin/", "/system/sbin/", "/sbin/", "/vendor/bin/", "/su/bin/"};
for (int i2 = 0; i2 < 6; i2++) {
try {
String str = strArr[i2] + bh.y;
if (new File(str).exists()) {
String exec = exec(new String[]{"ls", "-l", str});
String str2 = "isRooted=" + exec;
if (!TextUtils.isEmpty(exec)) {
if (exec.indexOf("root") != exec.lastIndexOf("root")) {
return true;
}
}
return false;
}
} catch (Exception e2) {
e2.printStackTrace();
}
}
return false;
}


# 6 通过hook绕过
Java.perform(function () {
var MiscUtil = Java.use("com.yoloho.libcore.util.MiscUtil");

MiscUtil.isRooted.implementation = function () {
return false;
}

MiscUtil.isSimulator.implementation = function (ctx) {
return false;
}


var SystemManager = Java.use("com.mobile.auth.gatewayauth.manager.SystemManager");
SystemManager.checkEnvSafe.implementation = function () {
return null;
}

});
//frida -U -f com.yoloho.dayima -l 2-自己hook绕过.js

image-20240517183016084

2.5 绕过方案四

1
2
3
4
5
6
7
8
9
10
11
12
13
14
15
##  aosp 刷机方案
# 后期咱们会使用aosp,编译,并刷入到手机---》做root时,把su文件名改掉--》后期app就检测不到了


#aosp
Android是开源的,AOSP(Android Open Source Project)为Android开源项目的缩写,自己编译Android系统

这个代码是开源的---》各个厂商可以拿到这个代码---》修改---》编译---》适配得到手机上---》就成了自己的操作系统
鸿蒙:可以装安卓apk---》不支持安卓apk--》大改了
小米miui都是

-安卓开发
-鸿蒙开发
-ios开发
-微信小程序

3 抓包分析

1
2
3
4
5
6
7
8
9
10
11
12
13
14
15
16
17
18
19
20
21
22
23
24
25
26
27
28
29
30
31
32
33
34
35
36
37
38
39
40
# 1 破解登录--抓包分析


# 2 抓包如下:
-请求地址:
https://uicapi.yoloho.com/user/login
-请求方式:
post
-请求头:没有特殊

-请求体:
username:18953675221
password:DHGWSCGPcjjlpgMtMe0yqQ== # 需要破
sign:66a559ce624629bf56853f55d46b0989 # 需要破
androidid:3ed94fb26816f9d0 # 安卓设备id,可以随机生成
mac
imei
density 3.5 # 固定
brand google # 固定
-请求参数:
device fd6d0ce86280f3fa11a0a0774c06fef2446aee82 # 要破
ver 630
screen_width 1440
screen_height 2712
model Pixel 2 XL
sdkver 30
platform android
releasever 11
channel 360
latt 0
lngt 0
networkType 0
token
userStatus 0


# 3 我们要破解
1 密码加密
2 device
3 sign

image-20240517183028679

4 反编译

4.1 device 的破解

1
2
3
4
5
6
7
8
9
10
11
12
13
14
15
16
17
18
19
20
21
22
23
24
25
26
27
28
29
30
31
32
33
34
35
36
37
38
39
40
41
42
43
44
45
46
47
48
49
50
51
52
53
54
55
56
57
58
59
60
61
62
63
64
65
66
67
68
69
70
71
72
73
74
75
76
77
78
79
80
81
82
83
84
85
86
87
88
89
90
91
92
93
94
# 1 反编译搜索  "device"  有很多
-换个思路 搜索 releasever 或者 userStatus 这些少见的,在他的上面或下面或许能看到device

# 2 找到位置:
# URLEncoder.encode 做url编码,只有有中文的时候,才有效
newBuilder.addQueryParameter("device", URLEncoder.encode(PeriodAPIV2.getInstance().getDeviceCode(), "UTF-8"));
# 3 device 的生成 PeriodAPIV2.getInstance().getDeviceCode()
public String getDeviceCode() {
String str;
synchronized (lock_device) {
if (deviceCode == null) {
setDeviceCode(); # 赋值位置会在这个方法中
}
str = deviceCode;
}
return str;
}

# 4 deviceCode的赋值位置
public void setDeviceCode() {
String str;
String str2;
String str3;
if (NetUtil.getSharedPreferences(SettingsConfig.KEY_USER_PERMISSION, false) && deviceCode == null) {
deviceCode = "NotFound";
String str4 = null;
try {
try {
str = ((TelephonyManager) getContext().getSystemService(AliyunLogCommon.TERMINAL_TYPE)).getDeviceId();
} catch (Exception e2) {
e2.printStackTrace();
str = null;
}
try {
str2 = Build.BOARD + Build.BRAND + Build.CPU_ABI + Build.DEVICE + Build.DISPLAY + Build.HOST + Build.ID + Build.MANUFACTURER + Build.MODEL + Build.PRODUCT + Build.TAGS + Build.TYPE + Build.USER;
} catch (Exception e3) {
e3.printStackTrace();
str2 = null;
}
try {
str3 = Settings.Secure.getString(getContext().getContentResolver(), "android_id");
} catch (Exception e4) {
e4.printStackTrace();
str3 = null;
}
try {
str4 = DayimaUtil.getPhoneMac();
} catch (Exception e5) {
e5.printStackTrace();
}
String str5 = "";
if (!Build.MODEL.equals("vivo X1w") || !Build.VERSION.RELEASE.equals(FaceEnvironment.SDK_VERSION)) {
try {
BluetoothAdapter defaultAdapter = BluetoothAdapter.getDefaultAdapter();
if (defaultAdapter != null) {
str5 = defaultAdapter.getAddress();
}
} catch (Exception e6) {
e6.printStackTrace();
}
}
String str6 = str + str3 + str2 + str4 + str5;
MessageDigest messageDigest = MessageDigest.getInstance("sha-1");
messageDigest.update(str6.getBytes());
byte[] digest = messageDigest.digest();
StringBuffer stringBuffer = new StringBuffer();
for (byte b : digest) {
String lowerCase = Integer.toHexString(b & 255).toLowerCase(Locale.getDefault());
if (lowerCase.length() < 2) {
lowerCase = "0" + lowerCase;
}
stringBuffer.append(lowerCase);
}
deviceCode = stringBuffer.toString();
} catch (Exception e7) {
e7.printStackTrace();
}
}
}
# 5 整理后变成
# 一堆字符串拼接
String str6 = str + str3 + str2 + str4 + str5;
# 执行sha1的摘要
MessageDigest messageDigest = MessageDigest.getInstance("sha-1");
messageDigest.update(str6.getBytes());
byte[] digest = messageDigest.digest();
# 最终得到deviceCode
deviceCode = stringBuffer.toString();


# 6 hook--setDeviceCode和messageDigest.update--打印出 update的参数时什么
-如果直接hook-messageDigest.update 会有很多地址
-同时hook setDeviceCode 和messageDigest.update
我们只要执行了setDeviceCode后的messageDigest.update再取出来,才是我们想要的

4.1.1 hooksetDeviceCode和messageDigest-update

1
2
3
4
5
6
7
8
9
10
11
12
13
14
15
16
17
18
19
20
21
22
23
24
25
26
27
28
29
30
31
32
33
34
35
36
37
38
39
40
41
Java.perform(function () {
var MiscUtil = Java.use("com.yoloho.libcore.util.MiscUtil");

MiscUtil.isRooted.implementation = function () {
return false;
}

MiscUtil.isSimulator.implementation = function (ctx) {
return false;
}


var SystemManager = Java.use("com.mobile.auth.gatewayauth.manager.SystemManager");

SystemManager.checkEnvSafe.implementation = function () {
return null;
}


var PeriodAPIV2 = Java.use("com.yoloho.controller.api.PeriodAPIV2");
var flag = false;

PeriodAPIV2.setDeviceCode.implementation = function () {
console.log("-------------------------setDeviceCode-------------------------")
flag = true;
return this.setDeviceCode();
}

var MessageDigest = Java.use("java.security.MessageDigest");
var ByteString = Java.use("com.android.okhttp.okio.ByteString");
MessageDigest.update.overload("[B").implementation = function (data) {
if (flag) {
console.log(ByteString.of(data).utf8(), '\n' );
console.log("---------------")
}
return this.update(data);
}


});
// frida -U -f com.yoloho.dayima -l 2.hook.js

4.1.2 hook到的数据

1
2
3
4
5
6
7
8
9
10
11
12
13
null3ed94fb26816f9d0taimengooglearm64-v8ataimenRP1A.201005.004.A1abfarm-01392RP1A.201005.004.A1GooglePixel 2 XLtaimenrelease-keysuserandroid-build76:ED:36:36:9A:0402:00:00:00:00:00 


# String str6 = str + str3 + str2 + str4 + str5;
null # str:设备id,可以为空

3ed94fb26816f9d0 # str3:安卓id 随机

taimengooglearm64-v8ataimenRP1A.201005.004.A1abfarm-01392RP1A.201005.004.A1GooglePixel 2 XLtaimenrelease-keysuserandroid-build # str2:手机平台等各种信息Build.BOARD + Build.BRAND + Build.CPU_ABI + Build.DEVICE + Build.DISPLAY + Build.HOST + Build.ID + Build.MANUFACTURER + Build.MODEL + Build.PRODUCT + Build.TAGS + Build.TYPE + Build.USER

76:ED:36:36:9A:04 # str4 wifi的mac

02:00:00:00:00:00 # str5 蓝牙 mac

4.2.3 python复现

1
2
3
4
5
6
7
8
9
10
11
import hashlib

data_string ="null3ed94fb26816f9d0taimengooglearm64-v8ataimenRP1A.201005.004.A1abfarm-01392RP1A.201005.004.A1GooglePixel 2 XLtaimenrelease-keysuserandroid-build76:ED:36:36:9A:0402:00:00:00:00:00"

# sha1加密
hash_object = hashlib.sha1()
hash_object.update(data_string.encode('utf-8'))
arg7 = hash_object.hexdigest()
print(arg7)
# 自己生成的:fd6d0ce86280f3fa11a0a0774c06fef2446aee82
# 抓包抓到的:fd6d0ce86280f3fa11a0a0774c06fef2446aee82

4.2 密码加密破解

1
2
3
4
5
6
7
8
9
10
11
12
13
14
15
16
17
18
19
20
21
22
23
24
25
26
27
28
29
30
31
32
33
34
35
36
37
38
39
40
41
42
43
44
45
46
47
48
49
50
51
52
53
54
55
56
57
58
59
60
61
62
63
64
65
66
67
68
69
70
71
72
73
74
75
76
77
78
79
80
81
82
83
84
85
86
87
88
89
90
91
92
93
94
95
96
97
98
99
100
101
102
103
104
105
106
107
108
109
110
111
112
113
114
115
116
117
118
119
120
# 1 搜索 "password"
# 2 找到
ArrayList arrayList = new ArrayList();
arrayList.add(new BasicNameValuePair("username", str)); # 用户名:输入的手机号
# 密码privateStrHandle,传入的了 str2:明文密码 str:手机号
String privateStrHandle = DayimaPrivateUtil.privateStrHandle(str2, str);
arrayList.add(new BasicNameValuePair("password", privateStrHandle));
StringBuilder sb = new StringBuilder();
sb.append(PeriodAPIV2.getInstance().getDeviceCode());
sb.append("user/login");
sb.append(str);
sb.append(privateStrHandle);
# sign的位置,后面破
arrayList.add(new BasicNameValuePair("sign", Crypt.encrypt_data(0L, sb.toString(), sb.length())));

# 3 密码如何加密的:String privateStrHandle = DayimaPrivateUtil.privateStrHandle(str2, str);
public class DayimaPrivateUtil {
# str是:明文密码
# str2是:手机号
public static String privateStrHandle(String str, String str2) {
String encrypt = AESUtil.encrypt(str, MD5Util.getMD5(str2).substring(0, 16).toLowerCase(), "yoloho_dayima!%_");
return TextUtils.isEmpty(encrypt) ? str : encrypt;
}
}


# 4 加密:AESUtil.encrypt

# 5 AESUtil.encrypt 传入参数:
第一个参数:str是:明文密码,
第二个参数: MD5Util.getMD5(手机号).substring(0, 16).toLowerCase()
第三个参数:"yoloho_dayima!%_"

# 6 具体加密方案
# str:明文密码
# str2:手机号通过md5摘要后,取了前16位
# str3:固定字符串"yoloho_dayima!%_"
public static String encrypt(String str, String str2, String str3) {
try {
# genAESCipher:
# 第一个参数str2:手机号通过md5摘要后,取了前16位
# 第二个参数str3:固定字符串"yoloho_dayima!%_"
# 第三个参数:数字1
return Base64.encodeBytes(genAESCipher(str2, str3, 1).doFinal(str.getBytes("utf-8")));
} catch (Exception unused) {
return "";
}
}
# 7 通过 genAESCipher 加密,加密后使用Base64编码
public static Cipher genAESCipher(String str, String str2, int i2) {
# str:手机号通过md5摘要后,取了前16位 --aes的key确定了
SecretKeySpec secretKeySpec = new SecretKeySpec(str.getBytes(), "AES");
# iv是固定字符串
IvParameterSpec ivParameterSpec = new IvParameterSpec(str2.getBytes());
try {
Cipher cipher = Cipher.getInstance("AES/CBC/PKCS5Padding");
cipher.init(i2, secretKeySpec, ivParameterSpec);
return cipher;
} catch (InvalidAlgorithmParameterException e2) {
throw new RuntimeException(e2);
} catch (InvalidKeyException e3) {
throw new RuntimeException(e3);
} catch (NoSuchAlgorithmException e4) {
throw new RuntimeException(e4);
} catch (NoSuchPaddingException e5) {
throw new RuntimeException(e5);
}
}

# 8 需要破解aes的
key:手机号通过md5摘要后,取了前16
iv:固定字符串yoloho_dayima!%_
待加密的明文:明文密码
# 9 读完后总结:
密码明文通过 aes的key:手机号md5后取前16位,iv是:yoloho_dayima!%_进行了加密---》使用base64编码


# 10 hook--encrypt看入参
Java.perform(function () {
var MiscUtil = Java.use("com.yoloho.libcore.util.MiscUtil");

MiscUtil.isRooted.implementation = function () {
return false;
}

MiscUtil.isSimulator.implementation = function (ctx) {
return false;
}


var SystemManager = Java.use("com.mobile.auth.gatewayauth.manager.SystemManager");

SystemManager.checkEnvSafe.implementation = function () {
return null;
}


var AESUtil = Java.use("com.yoloho.libcore.util.AESUtil");

AESUtil.encrypt.implementation = function (str,str2,str3) {
console.log(str,str2,str3)
return this.encrypt(str,str2,str3);
}


});

'''
//frida -U -f com.yoloho.dayima -l 5-hook--encrypt看入参.js

/*

lqz12345 # 明文密码 待加密数据
9eb091a1fb36369d
9eb091a1fb36369d # 手机号通过md5加密后,取了前16位 key
yoloho_dayima!%_ # 固定字符串 iv
*/


'''

image-20240517183049154

4.2.1 python 实现密码加密过程

1
2
3
4
5
6
7
8
9
10
11
12
13
14
15
16
17
import base64
from Crypto.Cipher import AES
from Crypto.Util.Padding import pad

KEY = "9eb091a1fb36369d"
IV = "yoloho_dayima!%_"

password = "lqz12345"

aes = AES.new(
key=KEY.encode('utf-8'),
mode=AES.MODE_CBC,
iv=IV.encode('utf-8')
)
raw = pad(password.encode('utf-8'), 16)
res = base64.b64encode(aes.encrypt(raw))
print(res)

4.3 sign加密破解

1
2
3
4
5
6
7
8
9
10
11
12
13
14
15
16
17
18
19
20
21
22
23
24
25
26
27
28
29
30
 # 1 刚刚找到sign的位置了
StringBuilder sb = new StringBuilder();
# 获取设备号
sb.append(PeriodAPIV2.getInstance().getDeviceCode());
#拼接了字符串
sb.append("user/login");
# str 是手机号
sb.append(str);
#privateStrHandle 加密后的密码
sb.append(privateStrHandle);
arrayList.add(new BasicNameValuePair("sign", Crypt.encrypt_data(0L, sb.toString(), sb.length())));


# 2 把一堆字符串 设备号+user/login+手机号+加密后的密码 通过encrypt_data加密
# JNI方法: libCrypt.so
public class Crypt {
static {
System.loadLibrary("Crypt");
}
# 第一个参数是0
# 第二个参数:设备号+user/login+手机号+加密后的密码
# 第三个参数:上面一堆字符串的长度
public static native String encrypt_data(long j2, String str, long j3);
}


# 3 我们应该读so文件了
libCrypt.so 看是静态注册还是动态注册

# 4 不硬破---》使用frida-rpc搞定

4.3.1 hook–encrypt_data看入参

1
2
3
4
5
6
7
8
9
10
11
12
13
14
15
16
17
18
19
20
21
22
23
24
25
26
27
28
29
30
31
32
33
34
35
36
37
38
39
40
41
42
43
44
# 脚本没写:结果是
# j2:0
# str:
64e6176e45397c5989504e76f98ecf2e63b2679e
user/login
18953675221
WA89qByLlDeaGjmVNzXm/w==

# j3:上面字符串长度

# 执行了encrypt_data jni方法--》得到 sign:7c91d494a18c46995fe2f9748d76ae7f


Java.perform(function () {
// 绕过root检测############
var MiscUtil = Java.use("com.yoloho.libcore.util.MiscUtil");
MiscUtil.isRooted.implementation = function () {
return false;
}
MiscUtil.isSimulator.implementation = function (ctx) {
return false;
}
// 绕过root检测############

// hook去掉吐司 手机不安全 提示
var SystemManager = Java.use("com.mobile.auth.gatewayauth.manager.SystemManager");
SystemManager.checkEnvSafe.implementation = function () {
return null;
}
//hook去掉吐司 手机不安全 提示


var AESUtil = Java.use("com.yoloho.libcore.util.Crypt");

AESUtil.encrypt_data.implementation = function (j2, str, j3) {
console.log(j2, str, j3)
return this.encrypt_data(j2, str, j3);
}

});
//frida -U -f com.yoloho.dayima -l 9-hook--encrypt_data看入参.js

// 0 fd6d0ce86280f3fa11a0a0774c06fef2446aee82user/login18953675221WA89qByLlDeaGjmVNzXm/w== 85

4.3.2 读so文件

1
2
3
4
5
6
7
8
9
10
11
12
13
14
15
16
17
18
19
20
21
22
23
24
25
26
27
28
29
30
31
32
33
34
35
36
37
38
39
# 1 使用ida打开 64位 so文件  libCrypt.so
# 2 静态注册
jstring __fastcall Java_com_yoloho_libcore_util_Crypt_encrypt_1data(JNIEnv_ *a1, __int64 a2, __int64 a3, __int64 a4)
{
jsize v7; // w22
const char *v8; // x0
char v10[36]; // # 36位长度的数组
__int64 v11; // [xsp+28h] [xbp-38h]

v11 = *(_QWORD *)(_ReadStatusReg(ARM64_SYSREG(3, 3, 13, 0, 2)) + 40);
v7 = a1->functions->GetStringUTFLength((JNIEnv *)a1, (jstring)a4);
v8 = a1->functions->GetStringUTFChars(a1, a4, 0LL);
# 执行 sub_1DA0往v10中添加了数据
sub_1DA0(a3, v8, v7, v10);
# 返回了v10
return a1->functions->NewStringUTF(a1, v10);
}

# 3 sub_1DA0--字符串格式
sprintf(a4, "%02x", (unsigned __int8)v27[0]);
sprintf(a4 + 2, "%02x", (unsigned __int8)v27[1]);
sprintf(a4 + 4, "%02x", (unsigned __int8)v27[2]);
sprintf(a4 + 6, "%02x", (unsigned __int8)v27[3]);
sprintf(a4 + 8, "%02x", (unsigned __int8)v27[4]);
sprintf(a4 + 10, "%02x", (unsigned __int8)v27[5]);
sprintf(a4 + 12, "%02x", (unsigned __int8)v27[6]);
sprintf(a4 + 14, "%02x", (unsigned __int8)v27[7]);
sprintf(a4 + 16, "%02x", (unsigned __int8)v27[8]);
sprintf(a4 + 18, "%02x", (unsigned __int8)v27[9]);
sprintf(a4 + 20, "%02x", (unsigned __int8)v27[10]);
sprintf(a4 + 22, "%02x", (unsigned __int8)v27[11]);
sprintf(a4 + 24, "%02x", (unsigned __int8)v27[12]);
sprintf(a4 + 26, "%02x", (unsigned __int8)v27[13]);
sprintf(a4 + 28, "%02x", (unsigned __int8)v27[14]);
return sprintf(a4 + 30, "%02x", (unsigned __int8)v27[15]);


# 4 不想读了--》觉得麻烦--》不硬破了--》使用frida-rpc破解

image-20240517183102798

5 frida-rpc使用

5.1 遇到so文件如何分析

1
2
3
4
5
# 1 硬核破解---》之前一直这么做--》难度很大

# 2 frida-rpc,直接调用手机中方法,传入参数,返回结果
# 3 自己写个app,放入它的so文件,我们主动调用
# 4 unidbg,模拟手机的运行环境--》直接执行so文件

5.2 frida-rpc是什么

1
2
3
4
5
6
7
# frida 提供了一种跨平台的 rpc (远程过程调用)机制,通过 frida rpc 可以在主机和目标设备之间进行通信,并在目标设备上执行代码

# rpc:远程过程调用
-后端开发--》微服务中会经常使用到


# frida-rpc

image-20240517183113907

image-20240517183122949

5.3 如何使用frida-rpc

1
2
3
4
5
6
7
8
9
10
11
12
13
14
15
16
17
18
19
20
21
22
23
24
25
26
27
28
29
30
31
32
33
34
35
36
37
38
### 流程
1 手机端启动frida-server # 完成了
2 运行app # 一定要运行app,否则手机内存中没有 encrypt_data
3 电脑端做端口转发 # 做了
4 电脑端写代码--调用手机端的方法,并且执行

import frida

rdev = frida.get_remote_device()
session = rdev.attach("大姨妈")

scr = """
rpc.exports = {
yy:function(j2,str,j3){
var res; // 定义变量
// 执行手机上的 com.yoloho.libcore.util.Crypt下的encrypt_data 方法
Java.perform(function () {
var Crypt = Java.use("com.yoloho.libcore.util.Crypt");
res = Crypt.encrypt_data(j2,str,j3);
});

return res;
}
}
"""

script = session.create_script(scr)
script.load()

# 使用python调用
sign = script.exports_sync.yy(0,
'fd6d0ce86280f3fa11a0a0774c06fef2446aee82user/login18953675221WA89qByLlDeaGjmVNzXm/w==',
85)
print(sign)

# 没有硬核破解--》也得到了sign
# 执行结果:7c91d494a18c46995fe2f9748d76ae7f
# 抓包结果:7c91d494a18c46995fe2f9748d76ae7f

6 自己写apk执行别人的so文件

1
# 自己开发一个app---执行大姨妈的so文件,调用encrypt_data,传入该传的参数--》得到sign结果

6.1 创建空项目

image-20240517183134857

image-20240517183143469

6.2 把dym的so文件copy到咱们项目中

image-20240517183156950

6.3 build.gradle 添加

1
2
3
4
5
sourceSets {
main {
jniLibs.srcDirs = ['libs']
}
}

image-20240517183206889

6.4 编写native类

1
2
3
4
5
6
7
8
9
10
11
12
// 包名跟dym一致
package com.yoloho.libcore.util;

public class Crypt {
static {
System.loadLibrary("Crypt");
}

public static native String encrypt_data(long j2, String str, long j3);

}

image-20240517183215928

6.5 自己写代码调用

1
2
3
4
5
6
7
8
9
10
11
12
13
public class MainActivity extends AppCompatActivity {
@Override
protected void onCreate(Bundle savedInstanceState) {
super.onCreate(savedInstanceState);
setContentView(R.layout.activity_main);
TextView tv = (TextView) findViewById(R.id.sign);
// 主动调用
String sign=Crypt.encrypt_data(0,"fd6d0ce86280f3fa11a0a0774c06fef2446aee82user/login18953675221WA89qByLlDeaGjmVNzXm/w==",85);


tv.setText(sign);
}
}

代码整合

1
2
3
4
5
6
7
8
9
10
11
12
# requests发送请求--》自己回去整

# 目前无论使用frida-rpc还是使用 自己写app,都需要手动参与
明文密码,手机号
密文密码:python实现了
device:python实现了
sign:fd6d0ce86280f3fa11a0a0774c06fef2446aee82 手机号 密码密码 ---》借助于frida-rpc,自己写的app生成
-rpc的可以直接调用--》手机要连到电脑上--》运行app才行


# unidbg整个不需要了这么连手机--》模拟手机环境

__END__